Now is as good of a time as ever to write my build thread. So here it goes.
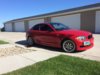
I bought my 2010 135i in July 2014. I was stationed at RAF Lakenheath in the UK and was looking to leave the Nissan platform. On a trip I took to Germany I kept seeing 135s everywhere and fell in love with the size and body lines. When I found out it came with a twin turbo inline 6 like the RB and 2J engines I was sold. I immediately started shopping for one when I returned home. I'm an active duty airman and needed to find a US production model in order to import it back to the states. I also knew I wanted it to be an N54 and 6 speed manual. There were only 2 US spec 135's for sale in Europe at the time. I decided on this one. The previous owner was an airman stationed outside of Brussels. After about a week of discussing out terms the seller drove the car to my house to deliver the car and took a train back home. I took posession of the car on July 26th 2014 with 52k miles and bone stock besides BMW Performance brakes, a Cobb stage 1 flash, and the three signature stripes on the passenger side fender.

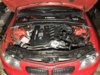
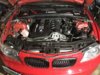
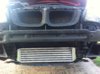
I immediately started ordering parts for the car. My first mods were the same as so many others. BMS DCI, Evolution Racewerks Chargepipe with Tial Q blow off valve, lower chargepipe, and Evolution Racewerks front mount intercooler.


The same week I installed the intercooler I decided to do a valve and runner cleaning using nylon brushes and picks and a whole ton of throttle body cleaner. At this time I also installed a set of Bosch OEM replacement spark plugs (for the last time ever).

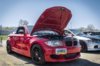
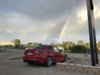
The car was now running a Cobb Stage 1+ tune and felt very quick (at the time). So the next thing I began to work on is the car's aesthetics. After a couple of months in the community I realized that I didn't want to be another sheep in the heard and install an M Replica bumper so I decided to go with a BMW Performance bumper and air ducts. I also painted my mirror caps, roof, stock 261 wheels, and rear diffuser gloss black to match the shadowline trim. The car also got a set of blackline LCI tail lights. The car still has all of the same paint today.


I was now completely in love with the way the car looked and drove. And at the same time I was getting ready to change assignments. So I cleaned the car up and took it to the shippers to move it to my next home. Minot, North Dakota.
I arrived to Minot in December of 2014 and the car followed me shortly after arriving to the St Louis MO port in January 2015. I flew down and drove it all the way back on bald runflats in the middle of a snowstorm (not fun). At the time the car was my daily commuter so I left it the way it was. I also began to encounter all of the dreaded maintenance problems we all have learned to know and love. It left me stranded in April 2015 with a bad water pump. At this point I should bring up that besides the bodywork and changing a few tires that all of the maintenance done on the car was performed by myself. So when the waterpump failed I ordered a new one from ECS and had my buddy tow me to the garage on base to install it. And I was back on the road again, for a while. In June of 2015 I began to get intermittent stumbling under low RPMs and when the engine had a load. And finally I started to experience the misfire codes that everyone had told me about. I did spark plugs for the second time, this time with NGK 5992s gapped at .022, and replaced the coilpacks with Delphi coils with no avail. And then finally one day I started the car, threw a cylinder 1 misfire and fuel injector code and the car began to reak of fuel. My cylinder 1 injector had failed.
So for those who aren't aware of where Minot, ND is located, I live an hour away from Rugby, ND which is the geographical center of North America. I am 2 hours away from Bismarck, the next closest city, and 8 hours away from Minneapolis, which is the closest BMW dealership. Or in other words, I live in the absolute middle of nowhere. So when my fuel injector failed I had no garage that would help me and nobody local to show me anything. So I began reading and researching. I ordered the bank 1 index 12 injectors, a new valve cover, and an OBD II flash cable. I also downloaded a zip file that contained NCS Expert and INPA. That was the easy part. Then I realized how much of a PITA it is to run INPA. It requires windows XP 32 bit which is impossible to find. The program is also primarily in german which is not my first language by any means. So what I ended up doing after almost a month of fighting with the program is I ran a windows virtual machine on my windows 7 laptop to emulate XP. I then had to install the drivers for the USB cable and assign the com ports for the USB. Finally I was connected to the car and could install my new injectors and code them. The car was back up and running like new again.

So I drove it the rest of the summer and by the time winter had rolled around again I had purchased a truck to daily and the car could finally sit in the garage just like it should. On Black Friday 2015 I finally decided it was time to start modifying the car again. I ordered a set of downpipes from N54Tuning and bought a used Berk street exhaust including midpipes. It sounds amazing and I still run this same exhaust today.

Along with the exhaust it was finally time to flash my Cobb stage 2+ map that I had been working towards for almost a year and a half. The car finally felt fast to me again. But not fast enough. I took it to a dyno day in April 2016 and made 330 whp and 370 wtq on a very unforgiving mustang Dyno. I was wasn't happy with these numbers and decided I wanted more. My new goal was to make 500 whp.

Unfortunately, my fuel injectors disagreed with my goals. And in June 2016, my cylinder 4 injector decided it didn't want to work. So bank 2 went in. And much quicker this time. The month after I did my bank 2 injectors, one of the members on a facebook group shared a link to the BMW Reimbursement program. I ckeched me VIN and sure enough my injectors fell under the program. I called BMW and submitted a request with my invoice from ECS and BMW sent me a check for the full cost of the brand new index 12 injectors. Best news ever!!
Shorty after I decided it was time for a wheel upgrade to help put down the extra power I was planning for. So in July I bought a used set of Apex EC-7s in 18x8.5 and 18x9.5 and a differential lockdown bracket.


The car for sure felt more secure with the wider wheels and the bracket. And at this time I realized how limited my growth was with my old accessport. So after many discussions with my buddies on the platform I decided to ditch the Cobb and go with a JB4/MHD stack. So I ordered a cheap android tablet off of Amazon and found a JB4 G5 used. I also bought a P3 gauge with the Jb4 for a great deal. I flashed a pump backend and started blending an E25 mixture still using the stock LPFP. The car felt like a monster. But the winter time came and it was back into the garage. I decided that my goals for the car would be to run stock turbos for one more year and really push them to the limits before I upgraded to a single turbo. So I ordered a set of MMP outlets new and bought a set of MMP aluminum relocation inlets and Precision Raceworks coolant and power steering brackets with the coolant level extension harness from another member that hadn't been installed. And my winter build began.


On Black Friday I waited up till 12:01 and ordered the first Precision Raceworks Stage 2+ modular fuel pump as soon as it hit the market as well as a set of Fuel It! feed lines and ethanol sensor with analyzer.


I also decided it was time for another valve cleaning. But this time I was going to do it the right way. So I ordered a plastic intake runner vacuum attachment and bought a portable sandblasted and gun attachment. And voila, a walnut blaster was made.


So after a little while I got it all back together and the car was running.


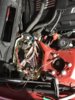
While doing the valve cleaning I had noticed some oil leaking from the oil filter housing and decided to go ahead and do the filter and coolter housing gaskets. I also saw a cool idea on N5XEntheusiasts about using a stainless braided 4AN line as a blow off valve vacuum line. So I ordered the parts, got new gaskets including intake manifold and throtte body gaskets, and did some maintenance and installed the new hose.


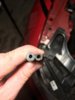
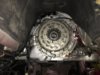
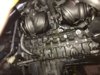
And after I put it all back together I went out to test drive it. It was acting a bit funny and I couldn't find out why. I put the car in 3rd gear and went to do a log. I had no boost down low and then it picked up for a couple thousand RPMs and then BOOM!!!! Something exploded and smoke was blowing out the back of the exhaust. The turbo blew up. I didn't find out how for a while longer but when I pulled the turbo I found that the rear compressor nut had snapped off and completelyate the turbine.

After a lot of reading and thinking I have a theory of what happened, and it makes me feel stupid. When I installed the P3 boost gauge, I used my BOV vacuum line as a boost reference source. I had only done it for a short period of time before the season had ended but I believe the weak vacuum pull on the BOV caused compressor sure on a couple high boost pulls which backed the nut out slightly till it broke off. But it's just a theory. I'll tell you that I'll never make that mistake again. However, my stock turbo winter build was about to get a lot more expensive and very interesting. This is where the real story begins.
I bought my 2010 135i in July 2014. I was stationed at RAF Lakenheath in the UK and was looking to leave the Nissan platform. On a trip I took to Germany I kept seeing 135s everywhere and fell in love with the size and body lines. When I found out it came with a twin turbo inline 6 like the RB and 2J engines I was sold. I immediately started shopping for one when I returned home. I'm an active duty airman and needed to find a US production model in order to import it back to the states. I also knew I wanted it to be an N54 and 6 speed manual. There were only 2 US spec 135's for sale in Europe at the time. I decided on this one. The previous owner was an airman stationed outside of Brussels. After about a week of discussing out terms the seller drove the car to my house to deliver the car and took a train back home. I took posession of the car on July 26th 2014 with 52k miles and bone stock besides BMW Performance brakes, a Cobb stage 1 flash, and the three signature stripes on the passenger side fender.
I immediately started ordering parts for the car. My first mods were the same as so many others. BMS DCI, Evolution Racewerks Chargepipe with Tial Q blow off valve, lower chargepipe, and Evolution Racewerks front mount intercooler.
The same week I installed the intercooler I decided to do a valve and runner cleaning using nylon brushes and picks and a whole ton of throttle body cleaner. At this time I also installed a set of Bosch OEM replacement spark plugs (for the last time ever).
The car was now running a Cobb Stage 1+ tune and felt very quick (at the time). So the next thing I began to work on is the car's aesthetics. After a couple of months in the community I realized that I didn't want to be another sheep in the heard and install an M Replica bumper so I decided to go with a BMW Performance bumper and air ducts. I also painted my mirror caps, roof, stock 261 wheels, and rear diffuser gloss black to match the shadowline trim. The car also got a set of blackline LCI tail lights. The car still has all of the same paint today.
I was now completely in love with the way the car looked and drove. And at the same time I was getting ready to change assignments. So I cleaned the car up and took it to the shippers to move it to my next home. Minot, North Dakota.
I arrived to Minot in December of 2014 and the car followed me shortly after arriving to the St Louis MO port in January 2015. I flew down and drove it all the way back on bald runflats in the middle of a snowstorm (not fun). At the time the car was my daily commuter so I left it the way it was. I also began to encounter all of the dreaded maintenance problems we all have learned to know and love. It left me stranded in April 2015 with a bad water pump. At this point I should bring up that besides the bodywork and changing a few tires that all of the maintenance done on the car was performed by myself. So when the waterpump failed I ordered a new one from ECS and had my buddy tow me to the garage on base to install it. And I was back on the road again, for a while. In June of 2015 I began to get intermittent stumbling under low RPMs and when the engine had a load. And finally I started to experience the misfire codes that everyone had told me about. I did spark plugs for the second time, this time with NGK 5992s gapped at .022, and replaced the coilpacks with Delphi coils with no avail. And then finally one day I started the car, threw a cylinder 1 misfire and fuel injector code and the car began to reak of fuel. My cylinder 1 injector had failed.
So for those who aren't aware of where Minot, ND is located, I live an hour away from Rugby, ND which is the geographical center of North America. I am 2 hours away from Bismarck, the next closest city, and 8 hours away from Minneapolis, which is the closest BMW dealership. Or in other words, I live in the absolute middle of nowhere. So when my fuel injector failed I had no garage that would help me and nobody local to show me anything. So I began reading and researching. I ordered the bank 1 index 12 injectors, a new valve cover, and an OBD II flash cable. I also downloaded a zip file that contained NCS Expert and INPA. That was the easy part. Then I realized how much of a PITA it is to run INPA. It requires windows XP 32 bit which is impossible to find. The program is also primarily in german which is not my first language by any means. So what I ended up doing after almost a month of fighting with the program is I ran a windows virtual machine on my windows 7 laptop to emulate XP. I then had to install the drivers for the USB cable and assign the com ports for the USB. Finally I was connected to the car and could install my new injectors and code them. The car was back up and running like new again.
So I drove it the rest of the summer and by the time winter had rolled around again I had purchased a truck to daily and the car could finally sit in the garage just like it should. On Black Friday 2015 I finally decided it was time to start modifying the car again. I ordered a set of downpipes from N54Tuning and bought a used Berk street exhaust including midpipes. It sounds amazing and I still run this same exhaust today.
Along with the exhaust it was finally time to flash my Cobb stage 2+ map that I had been working towards for almost a year and a half. The car finally felt fast to me again. But not fast enough. I took it to a dyno day in April 2016 and made 330 whp and 370 wtq on a very unforgiving mustang Dyno. I was wasn't happy with these numbers and decided I wanted more. My new goal was to make 500 whp.
Unfortunately, my fuel injectors disagreed with my goals. And in June 2016, my cylinder 4 injector decided it didn't want to work. So bank 2 went in. And much quicker this time. The month after I did my bank 2 injectors, one of the members on a facebook group shared a link to the BMW Reimbursement program. I ckeched me VIN and sure enough my injectors fell under the program. I called BMW and submitted a request with my invoice from ECS and BMW sent me a check for the full cost of the brand new index 12 injectors. Best news ever!!
Shorty after I decided it was time for a wheel upgrade to help put down the extra power I was planning for. So in July I bought a used set of Apex EC-7s in 18x8.5 and 18x9.5 and a differential lockdown bracket.
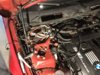
The car for sure felt more secure with the wider wheels and the bracket. And at this time I realized how limited my growth was with my old accessport. So after many discussions with my buddies on the platform I decided to ditch the Cobb and go with a JB4/MHD stack. So I ordered a cheap android tablet off of Amazon and found a JB4 G5 used. I also bought a P3 gauge with the Jb4 for a great deal. I flashed a pump backend and started blending an E25 mixture still using the stock LPFP. The car felt like a monster. But the winter time came and it was back into the garage. I decided that my goals for the car would be to run stock turbos for one more year and really push them to the limits before I upgraded to a single turbo. So I ordered a set of MMP outlets new and bought a set of MMP aluminum relocation inlets and Precision Raceworks coolant and power steering brackets with the coolant level extension harness from another member that hadn't been installed. And my winter build began.
On Black Friday I waited up till 12:01 and ordered the first Precision Raceworks Stage 2+ modular fuel pump as soon as it hit the market as well as a set of Fuel It! feed lines and ethanol sensor with analyzer.
I also decided it was time for another valve cleaning. But this time I was going to do it the right way. So I ordered a plastic intake runner vacuum attachment and bought a portable sandblasted and gun attachment. And voila, a walnut blaster was made.
So after a little while I got it all back together and the car was running.
While doing the valve cleaning I had noticed some oil leaking from the oil filter housing and decided to go ahead and do the filter and coolter housing gaskets. I also saw a cool idea on N5XEntheusiasts about using a stainless braided 4AN line as a blow off valve vacuum line. So I ordered the parts, got new gaskets including intake manifold and throtte body gaskets, and did some maintenance and installed the new hose.
And after I put it all back together I went out to test drive it. It was acting a bit funny and I couldn't find out why. I put the car in 3rd gear and went to do a log. I had no boost down low and then it picked up for a couple thousand RPMs and then BOOM!!!! Something exploded and smoke was blowing out the back of the exhaust. The turbo blew up. I didn't find out how for a while longer but when I pulled the turbo I found that the rear compressor nut had snapped off and completelyate the turbine.
After a lot of reading and thinking I have a theory of what happened, and it makes me feel stupid. When I installed the P3 boost gauge, I used my BOV vacuum line as a boost reference source. I had only done it for a short period of time before the season had ended but I believe the weak vacuum pull on the BOV caused compressor sure on a couple high boost pulls which backed the nut out slightly till it broke off. But it's just a theory. I'll tell you that I'll never make that mistake again. However, my stock turbo winter build was about to get a lot more expensive and very interesting. This is where the real story begins.
Attachments
-
 IMG_1137.JPG290.9 KB · Views: 394
 -
 IMG_2319.JPG94.5 KB · Views: 245
 -
 IMG_2601.JPG361.7 KB · Views: 246
 -
 IMG_2935.JPG308.6 KB · Views: 237
 -
 IMG_2936.JPG285.5 KB · Views: 251
 -
 IMG_2937.JPG259.6 KB · Views: 262
 -
 IMG_3766.JPG156.7 KB · Views: 239
 -
 IMG_4022.JPG203.1 KB · Views: 241
 -
 IMG_4026.JPG235.2 KB · Views: 241
 -
 IMG_4031.JPG174.1 KB · Views: 219
 -
 IMG_4077.JPG210.1 KB · Views: 245
 -
 IMG_4078.JPG222.1 KB · Views: 249
 -
 IMG_4134.JPG281 KB · Views: 241
 -
 IMG_4137.JPG258.5 KB · Views: 248
 -
 IMG_4138.JPG297.2 KB · Views: 254
 -
 IMG_4174.JPG219.8 KB · Views: 282
 -
 IMG_4179.JPG299 KB · Views: 273
 -
 IMG_4180.JPG249.8 KB · Views: 253
 -
 IMG_4194.JPG311.5 KB · Views: 219
 -
 IMG_4230.JPG221.3 KB · Views: 250
 -
 IMG_4231.JPG236.2 KB · Views: 253
 -
 IMG_4235.JPG254.9 KB · Views: 238
 -
 IMG_4237.JPG201.6 KB · Views: 265
 -
 IMG_4292.JPG261.3 KB · Views: 249
 -
 IMG_4356.JPG322.1 KB · Views: 256
 -
 IMG_4358.JPG301.9 KB · Views: 227
 -
 IMG_4426.JPG316.2 KB · Views: 241
 -
 IMG_4436.JPG252.4 KB · Views: 231
 -
 IMG_4446.JPG294 KB · Views: 251
 -
 IMG_4447.JPG240.5 KB · Views: 237
 -
 IMG_4456.JPG213 KB · Views: 244
 -
 IMG_4473.JPG319 KB · Views: 242
 -
 IMG_4474.JPG116.1 KB · Views: 243
 -
 IMG_4608.JPG351.7 KB · Views: 275
 -
 IMG_4609.JPG252.2 KB · Views: 241
 -
 IMG_4613.JPG247.4 KB · Views: 237
 -
 IMG_4614.JPG313.4 KB · Views: 252
 -
 IMG_4615.JPG254.7 KB · Views: 266
 -
 IMG_4619.JPG234.3 KB · Views: 266
 -
 IMG_4631.JPG253.5 KB · Views: 235
 -
 IMG_4632.JPG218.8 KB · Views: 278
 -
 IMG_4636.JPG232.4 KB · Views: 249
 -
 IMG_4638.JPG347.3 KB · Views: 247
 -
 IMG_4653.JPG234.7 KB · Views: 257
Last edited: