

We have seen a lot of talk lately about issues with the Spec twin disk. We have had nothing but very good luck with this clutch, so are a little surprised of the reports. We are installing one for a customer, so we wanted to outline the process. It has MANY steps that must be followed EXACTLY to get it right. Parts that come with the clutch cannot be used, tools that come with the clutch need other tools to get it perfect. All these small things work together to provide trouble free service.
So lets start with the basics. Keep in mind, a LOT of these procedures are just general steps for properly installing any clutch, but many of the ones outlined here, are specifically for the Spec Twin Disk for the N54
Remove your Trans, and pull your old Pressure plate, and Flywheel out. You will need to lock the crank to do this. Best way to do this is with this tool here. BMW Part # 11 9 260


Once you have the crank locked, use a 6mm Allen socket, and pull the pressure plate you will have to use a pry bar to get it off by alternating back, and forth until it comes loose. Next the flywheel, same technique with the Flywheel, as it will be stuck on the dowel etc. With a little work, and some patience you should be able to get them off. BE CAREFUL the flywheel can pop off if you are not paying attention, and its heavy enough to break toes, or your face if you have to be doing this on jack stands, and are laying under the car. Fair warning
Next take your stock flywheel, and press the input shaft out of it. This locates the trans shaft centered in the assembly. You then press the input shaft into your new flywheel. If you do NOT have a press, take it to someone who does! Beating it out with a hammer is a sure way to mushroom it, I.e ruin it, and your chances of it ever going into your trans again.


After that is done, take some Starting fluid (NOT BRAKEKLEEN!!! It does not cut oil nearly as well as starting fluid) and clean up the area behind the flywheel. Lots of gunk can build up back here, get it all out. Next inspect the Rear main seal, if you see any weeping, shoot even if you don't. NOW is the time to change it. Its $41 bucks, and worth every penny, if your rear main leaks oil onto your new clutch, you will be buying another one, and doing this job again. $41 seems pretty cheap to avoid that doesn't it...
Now get your new flywheel, and find the larger hole on the back that takes the dowel, either eyeball it or mark it, and get it set on the crank in the proper position, now take 4-5 bolts, and put them in a star pattern by hand (Use new bolts). Once the flywheel is secure, use a plam ratchet or something that can apply very little tq, and going in a star pattern suck the flywheel in evenly. Once it stops its time for the 1/2" Tq wrench. These take 89 ft/lbs. I put 90 on mine. Go in 3 steps 50ft lbs/70 ftlbs/90 ftlbs in a star pattern around the 8 bolts. Once they all are Tq'ed check them again. You want NO movement, and the Tq wrench either breaking away, or beeping whichever type you use (click, or digital)
Ok so the flywheel is in. High five yourself, and get some water. Once you are done, grab that starting fluid we talked about, and some clean paper towels. Oil / grease/ dirt of ANY kind is the enemy of your new clutch. Spray the paper towels with the starting fluid, and wipe the surface of the flywheel, until they come back clean. No more grey, or black. (you will be surprised at how much oil, and dirt freshly machined surfaces have on them)


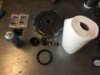
Ok our flywheel is nice, and clean. Lets turn our attention to what is left in the box. Pressure plate / disk assembly, Throw out bearing, pilot bearing, pressure plate bolts, plastic alignment tool.
What is not included that is needed. BETTER pressure plate bolts, BMW alignment tool, extreme pressure grease, paint pen, or white out, Lock- Tite 243
Set it all out on a nice clean bench something like this.


First thing to notice. The bolts Spec provides are NOT TO BE USED. They are fully threaded, and WILL snap on you if you want to install this clutch right. There are a couple reasons not to use these bolts. #1 the Allen key is 4mm, VERY small, good odds of stripping it before you get to the TQ Spec, #2 if you do manage to get to the Tq spec, these will have stretched, and most likely broken... (We are not here to ask why spec includes these bolts, only here to let you know which bolts you need)

You will need to buy two packs of M6x1.0x60 grade 12.9 bolts 5 per pack. Fastenal usually has them in stock. Take one of the two washers Spec includes with their bolts, and put them on the new bolts. Save the other bolts, and washers for another project or toss them, up to you, but they will not be used. Set the new bolts aside til we need them.

Ok next up, marking the assembly, then cleaning. Spec marks the assembly for you, buy I always like to add another one so there is no confusion.


TAKE SPECIAL CARE to how the stack is assembled (take pictures if you need to), and pull the top disk off set it aside.
Same cleaning method as before clean the top side of the center plate til the towels come away clean...


Once this is done, Now grab the center plate from the outside edge, and pull it off. Using that starting fluid, and towels, do the same as the flywheel on the back side until the towels come off clean...

Now remove the bottom disk, and clean the pressure plate itself. Once this is done, reassemble EXACTLY how it was.

Ok now the clutch is cleaned, and ready for assembly. This is by far the trickiest part of the entire job, and where most of the issues stem from.
Take the plastic alignment tool, and stick it through the stack from the finger side out, this will align all the splines. Take that extreme pressure grease we talked about, and put some in the center hole so it slides onto the input shaft easily.


Now with that installed, take the entire stack making sure nothing falls out, and set it against the flywheel, make sure the tool locates onto the input shaft WITHOUT pushing out. If you have this right, you should be able to spin the tool, and BOTH disks will spin with it. Now take 4 bolts / washers, and line up all your marks from flywheel to stack. Once lined up, start the 4 bolts all opposite each other finger tight. Take your palm ratchet, and barely snug the 4 bolts, I mean barely. What you are trying to achieve here is, you want to be able to pull the tool out without the disks falling down, but you want them loose enough that the factory tool can now align them perfectly.


Why are you using two tools you ask? The kit only comes with one. Well because the plastic tool while aligning the splines does NOT perfectly center the disks to the shaft. This will cause the trans shaft to hang during install, and possibly bend one disk, wreak general havoc, and cause you to post about how your spec twin disk doesn't work right...

So now that we have those snug, take the factory tool, and insert it into the stack, 100% chance its NOT going to slide in. The plastic tool is not accurate enough. The factory tool is chamfered on both ends, usually you can just using your hands, with pressure work it in, you will feel it when it goes, it slides ALL the way in, and you know its engaged both disks. If you try, and try, and it wont go. You will have to start the procedure again, put the plastic tool back in, loosen the 4 bolts until the disks are free, and jiggle it around trying to center them. Now snug the 4 again, and retry the factory tool. This is what it looks like when it is installed properly. The end of it is almost even with the front of the outside disk

Now using your palm ratchet, snug the 4 bolts in a rotating pattern a little bit more. This will lock the disks in place.
NOW, VERY IMPORTANT! Remove the factory tool by grabbing the small bolt, and pull it out. It will have resistance, but it should pull right out. (this is an awesome tool). Once it is out, we know they are centered, but we need to check that we didn't lose spline alignment. Again if centered but the disks are our of alignment with one another, you will hang one disk when installing the trans, possibly bending it depending on how hard you force it, and you will have a clutch that does not work properly...
So to check the spline alignment. Grab the plastic tool again, and slide it in, it can be very hard to see if its going ALL the way in. An easy way to check this. Grab that white out, or paint pen, and douse the end of the tool with white. Now slide it as FAR as it will go. Pull it out, did it transfer some of the white to the outer portion of the input shaft? If so then you are good to go. You have the disks not only centered to the shaft, but also perfect shaft alignment! Give yourself another high five, and get a drink, the hard part is over.


If it does not transfer white, it means you are prob sliding into the first disk, BUT hanging on the second so its not going all the way in. This tool is essentially mocking your trans, if these do not slide in easily, and freely, your trans shaft will not either. If this happens, take a deep breath, because it means you have to start over. Loosen the 4 bolts, and follow the steps above until all is aligned, and centered. It has taken me 3-4 times on really stubborn clutches to get everything perfect.
Ok now for final pressure plate assembly, and Tqing. Get your Tq wrench, and set it to 12 ft / lbs. THAT IS ALL! It does not matter what anyone tells you, 15, 17, 19, etc. If you want to break the bolts in these pressure plates, or stretch them to where they will fail apply more than 12 ft lbs, and I can assure you. You will either be pulling this all back apart to try to remove a broken bolt, or they will break while the clutch is in the car. This is part of the reason for the lock tite, Less Tq, while no fear of the bolts backing out. Once the wrench is set, grab your remaining 5 bolts, and the Lock Tite 243. Mark the 4 bolts you installed previously. Apply a small amount of the lock tite to the threads of the five bolts, screw them all in hand tight, then with the palm ratchet, snug them up in a star pattern. Using your mark, remove each of the 4 bolts one by one, apply lock tite, and put it back in before removing the next.


This brings us to another VERY IMPORTANT step. Tqing the Pressure plate down. You MUST do this evenly. If you do not, you will ruin the pressure plate, and ensure that you have a clutch that does NOT work as it should. Using a star or circular pattern with the palm ratchet, tighten each bolt down 1/4 - 1/2 turn, going around, and around until the bolts no longer will move with the palm ratchet. This means the pressure plate is fully collapsed, and is putting full pressure on the disks.
Now take the already set Tq wrench, and using the same star or circular pattern, TQ the bolts to 12 ft/lbs. Keep going over, and over until you get NO bolt movement before the wrench either clicks off, or beeps. If you have one that seems to keep turning, and will not click off or beep. STOPPPPPPP! Do not keep trying, remove that bolt, and try another one, that continuous turning means the bolt is stretching, and it will break if you keep going. Using another bolt will usually fix the issue if you have one. This is why buying two packs of 5 is good, you have an extra bolt.

Once this is complete, you have FINISHED the clutch install, and have done so correctly to avoid most all issues.
What is left is on the trans side. Remove the arm that actuates the clutch, remove the old Throw out bearing, and toss it. Clean the arm, use some extreme pressure grease, and install the new TB in the LOW position. DO NOT USE THE HIGH POSITION. Next grease up the indents where the arm pivots on the slave cylinder, and the knuckle. Also grease up the bushing the TB slides on. Once all that is done, reinstall the arm into the Trans, grease up the input shaft bearing, and you are ready to reinstall the trans.


There is ONLY ONE reason to replace the input shaft bearing. That is if you feel it, and it feels rough, it has obvious damage, etc. That bearing is EXTREMELY difficult to replace, and more than likely will NOT come out, without extreme measure you do not want to get yourself into.
Once you are all ready, put the Trans back in the way it came out. It should slide all the way up against the motor, or come very very close. If you have 1/2" or more space, and its stopped, DO NOT suck it in with the bolts, something is not right, and if you do this, you will have issues.
Hopefully you removed the slave from the trans before you pulled it so you do not have to bleed the clutch, if this is the case, get a few bolts tight, resinstall the slave, and get in the car, and feel the clutch. How does it feel, if good finish putting the trans bolts in, follow the factory break in procedure, and enjoy a light pedal, and high holding power, that a twin disk provides twin disk provides....
Extra parts list:
Crank holding tool BMW 11 - 9 260
Lock Tite 243
Fastenal M6x1.0X60mm 12.9 bolts
White out or paint pen
Factory BMW Clutch tool 83 30 0 495 449
Extreme Pressure Grease CRC - Stalube SL3191
Starting fluid or Ether
Paper towels
1/2" Tq Wrench
3/8" Tq Wrench
Attachments
Last edited:
