Build Log: M57 X5

TwinTurboWagon

Corporal
Nov 7, 2016
223
241
0
San Diego
End of Winter Start of Spring Update.

Truck/trailer rental? No thanks!
AJFCJaXYIrUCe340Vlqq4e_E5kF4rTkFlV01u8GUtQKEhWTMzutnne3dxiWyT6iqelPHhCLITZ_wIDdLQvCYO3wLj9FnmfDW1lslSHO1wsmaKXYozzNfKwtniyy-Q0DnnJJHgIPUiSVq0EWOrMPJyzHcAduoaw=w1239-h929-s-no


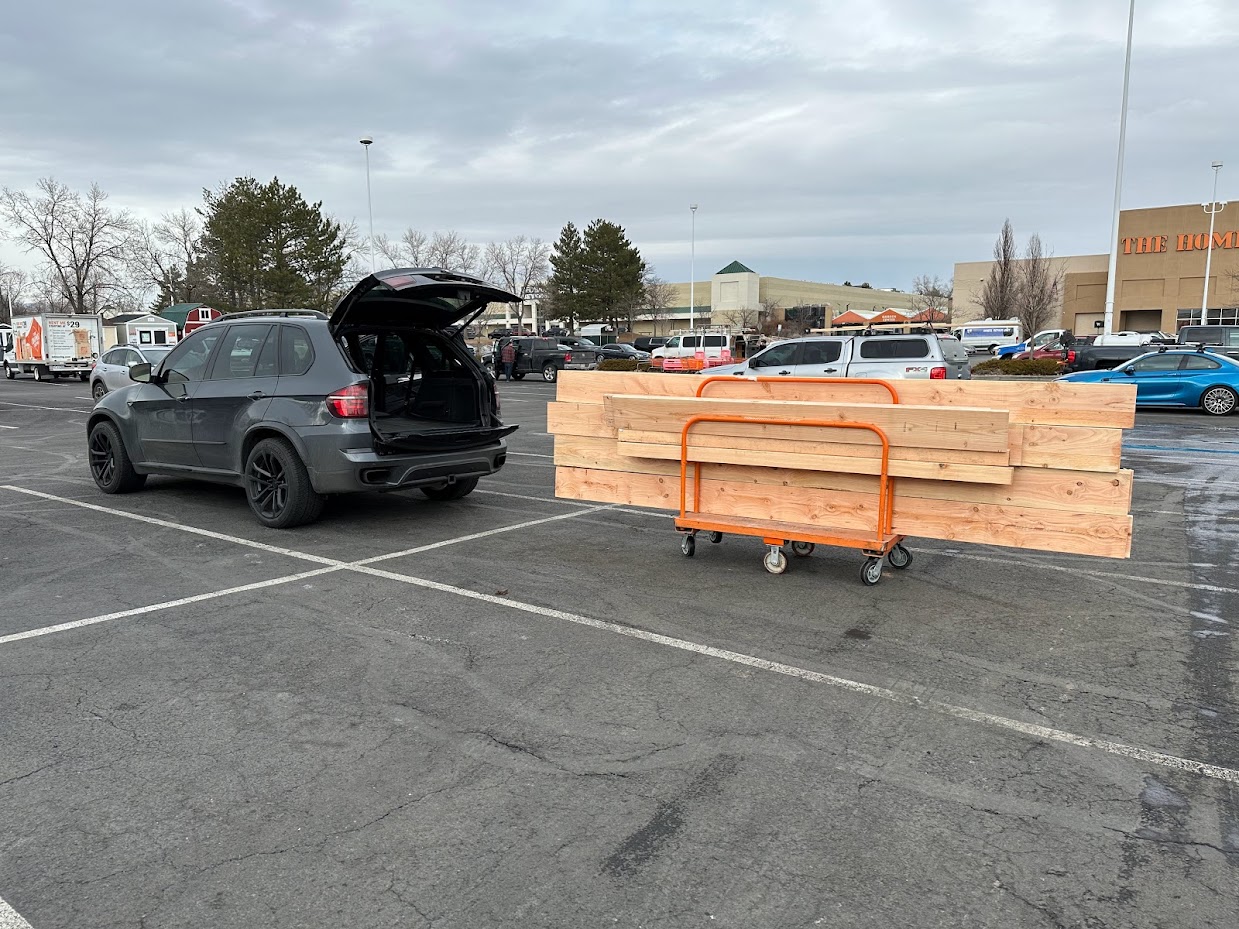
Passenger seat removal was key
3nkhPOXSY1W6INcnjmP1-A=w1239-h929-s-no?authuser=0v.jpg


Fighting the good fight against winter grime
-abQh0Zkoa9YopUIqBMc2sA=w1239-h929-s-no?authuser=0.jpg


Got caught in a snow squall on a snowboard trip. This was the drive up...
cEUqgyIkFAKb-uczY0AyZeQ=w1239-h929-s-no?authuser=0.jpg


This was the drive back (in squall)
6-DYko8i_O7hr9XvJDWXAWg=w1239-h929-s-no?authuser=0.jpg


Aftermath, proud to say this is my best "winter coat" to date.
CY3BaXRGG9j0fVqScqEehGg=w1239-h929-s-no?authuser=0.jpg

https://lh3.googleusercontent.com/p...NB4z_4DpLkBUnAh2Ug=w1239-h929-s-no?authuser=0

X5 + SNOW + MUSHROOMS=
kxCoYW2XhMUco-48Ih6PU2Q=w1239-h929-s-no?authuser=0.jpg


Telluride is very nice, probably the most striking mountains I have seen so far in the Rockies.
MI7Eik2tmO2NCgjMdVLd9OQ=w1239-h929-s-no?authuser=0.jpg

WFawJt_iMNR-RPl-LQWETAA=w1239-h929-s-no?authuser=0.jpg


Picked up some kayaks from the in-laws. MPG wasn't great driving from Havasu, AZ to Denver.
anEHKtaWg-B9PjtNwtUsotQ=w1239-h929-s-no?authuser=0.jpg


All 3 vehicles clean at once? Had to snap a pic
tKPfm8cYecMTJyX5tjkaX0Q=w1239-h929-s-no?authuser=0.jpg


New summer wheels inbound. Switching the 5th Gen 1LE ZL1 wheels for 6th Gen. I prefer the more traditional 5 spoke look but the wheels are still chunky, concave, and relatively light. The wheels are currently at the machine shop, then straight to the powder coated for a fresh satin black finish.
IaM26QJ-nNn7VrEMk3NSeHg=w1239-h929-s-no?authuser=0.jpg

7XYZZXjZ7N85hRo_-_IyNJw=w1239-h929-s-no?authuser=0.jpg

07oRzW-nJiL9geG4ZwJmiSA=w1239-h929-s-no?authuser=0.jpg


I also snagged an exhaust manifold which will be ceramic coated. This is part of my hot-side refresh which will include new ex-manifold studs, hardware, and all new gaskets to hopefully, finally, resolve my annoying exhaust leak.
MkTkTACr_G0kyuuS1nZHq5w=w1239-h929-s-no?authuser=0.jpg
 

fmorelli

Lieutenant General
Staff member
Aug 11, 2017
3,748
3,592
0
57
Virginia
Ride
E89 Z4 35i, F10 535d
@TwinTurboWagon, have you considered barrier coating the exhaust manifold instead of cerakote? For example, Swain who has been in the business for many decades, used by NASCAR, etc. We were working with them back in the 90's and they were good, for endurance racing applications.
 

TwinTurboWagon

Corporal
Nov 7, 2016
223
241
0
San Diego
Just rolled over 131,000 and since my last update in April I have averaged >26mpg over the past 5,000 miles, very respectable. Over the past 5 months the X5 has been a doing it's job facilitating work and play.

Mountain bike here
2TsMEpVZb91AxH6EPAhukXQ=w1230-h923-s-no?authuser=0.jpg

Mountain bike there
rOrIkP2gC5uy8Pop3i1yRAA=w1230-h923-s-no?authuser=0.jpg

Mountain bike everywhere
uC_8sbj9keuJSlXMvC9_kDw=w1230-h923-s-no?authuser=0.jpg

Yakin' too
CzhYdg1KEp9qByO2F0cgYHA=w1230-h923-s-no?authuser=0.jpg


Finally got a strut for my cargo floor!
SltiHqinNerHwpkEtfarrCA=w1230-h923-s-no?authuser=0.jpg

0b8UAmWAbPAwMDONW2n1lcQ=w1230-h923-s-no?authuser=0.jpg


Got my manifold back with it's ceramic coating.
jPjjfVG6ig61FFTIDesowFg=w1230-h923-s-no?authuser=0.jpg

ltgNI7T-iESl5II0UbjSKXg=w1230-h923-s-no?authuser=0.jpg


Pile-o-goodies. Oil, various filters, tie rods, and some window surrounds for the C/D pillar window. Also exhaust manifold studs, nuts, and gaskets.
6x-QmnXo0vIRHVIZkxjcRug=w1230-h923-s-no?authuser=0.jpg


New tire deflectors
Bt1YF2WF5-1K6KbJNtpxn_2g=w923-h923-s-no?authuser=0.jpg


New wheels mounted
5qXPNF_qVXzw9SmVRziT6_g=w1230-h923-s-no?authuser=0.jpg

Or5JU5n9HkuFu16ajk-tr2Q=w1230-h923-s-no?authuser=0.jpg

hBm4nh9g8OgsQ8cxhePetfg=w1230-h923-s-no?authuser=0.jpg

uyDAJ3uTgaOV1IHcXqOkZKA=w1230-h923-s-no?authuser=0.jpg


Washy wahsy
S_N7muK_umNEBoSbSNHkJSg=w1230-h923-s-no?authuser=0.jpg


Back to Work! Strapping and insulation for my garage ceiling. It will be R59!
QC68V6NeBpmhI39aa557fcA=w1230-h923-s-no?authuser=0.jpg


Back to Play!
Jvl1KYWVOV-7fYjGrnN-Dgg=w1230-h923-s-no?authuser=0.jpg
 
  • Like
Reactions: wheela

TwinTurboWagon

Corporal
Nov 7, 2016
223
241
0
San Diego
Driving home from a trailhead I was on a dirt road which had a lot of washboard surfaces. On the drive a small front end clunk became a front end bang-bang. When I got back onto paved roads the clunking continued so I knew something let go. When closer to home and stopped at a red light I did notice the smell of raw diesel which I thought was odd but I didn't think too much about it .....until I got home and noticed a trail of fuel in the driveway. lol

As it turns out the Phantom fuel system (which is like a small fuel filter) which was installed in-line near the OEM fuel filter had it's connection rattled loose and was leaking. For simplicity and reliability I removed the unit. This was originally installed since it is intended to "excite" the fuel and improve combustibility and therefore improve economy and performance. Hard to really extrapolate data to confirm that since there are so many variables in the mix but I figured with it now removed I can see if there are any noticeable differences.

I figured the clunking was from the Phantom fuel sysytem banging around since it was loose and was only secured with a couple zip ties. When removing the Phantom fuel system I also swapped in a fresh OEM fuel filter.

Better to have a fuel leak under the vehicle instead of the engine bay!
TTcL9ZUn3FZt39eINlEnyag=w1230-h923-s-no?authuser=0.jpg


Phantom system which was removed
k0aHSlbHo3c7ozVTbRjgtkw=w1230-h923-s-no?authuser=0.jpg


We replaced our utility sink with a dog wash for our good boi Oliver.
ET_d4EaZFR5waGbmPTcA89Q=w1230-h923-s-no?authuser=0.jpg


Dog-wash also = auto parts and wheel washer!
VNG-t83rOFG48T_zhtOr4PA=w1230-h923-s-no?authuser=0.jpg


Going for a drive after addressing the fuel system it became very clear I did NOT resolve the clunking. Time to go back in...
l_J4fPIfWF0hKDFgh0_Kv_Q=w1230-h923-s-no?authuser=0.jpg


rugh rough
JyMq0F8pJX8KVxxfz1_GFGA=w1230-h923-s-no?authuser=0.jpg


RUGH ROUGH!!!
XlEhnkemtFEcVo8Lo415wLg=w1230-h923-s-no?authuser=0.jpg

YkhSvkMfrFzvlcp0dmId6oA=w1230-h923-s-no?authuser=0.jpg


Found the problem! Sturt mounts had 40k on them but this damage was caused by an installation error ...by me. Turns out I didn't install the metal washer on the underside of the strut mount, therefore on the rubber was keeping the strut shaft from poking through, if the washer was installed it would bottom out on the strut mount and squish the foam rings. Whoops!!
QcL3NQRgAiolKV6qUNSrwHQ=w1230-h923-s-no?authuser=0.jpg

A5KSdF5Vi-l4xH2qEIF4u1Q=w1230-h923-s-no?authuser=0.jpg


I had some sturt mounts shipped from FCP and while I waited for them to arrive I took advantage of having the X5 in the garage and did some other maintenance.

Cabin (and recirc) filters
Kl2tAKT7wB9UyHdL3CxCK1w=w1230-h923-s-no?authuser=0.jpg


New passenger handle
Q8dWive5NsphUJ2paDFwgNA=w1230-h923-s-no?authuser=0.jpg

z9RA-q4NXLc7tEPWDVJMSVw=w1230-h923-s-no?authuser=0.jpg

Rl_XR0K5T2TI44-TDcjSI6g=w1230-h923-s-no?authuser=0.jpg


Added some more sound deadening material (felt tape) to various locations on the dash to known creaky locations, back of Nav screen shown here.
1QRSEEJXI5swVG4DWlbj64g=w1230-h923-s-no?authuser=0.jpg


The metal grills on my P3 vent gauge were once black but have become copper-ish from, I assume, UV. So it was refreshed with Plasti Dip.
LL9oJhrUjiI4jA04-a7SNeQ=w1230-h923-s-no?authuser=0.jpg

t9VjJu7Ge8YohN9lCuM40bg=w1230-h923-s-no?authuser=0.jpg

2XGItktJervSJMU81zXQUDg=w1230-h923-s-no?authuser=0.jpg


On a side-note this style jack stand does well on the Swisstrax floor and doesn't deform or damage it.
wXIkKtUGsiIGWBbEfZjzjAQ=w1230-h923-s-no?authuser=0.jpg

2YAu4NE-g3fQkVKlEc_4rhQ=w1230-h923-s-no?authuser=0.jpg
 

TwinTurboWagon

Corporal
Nov 7, 2016
223
241
0
San Diego
Time for the long overdue leather cleaning. I previously used Leatherique on my wife's Q7 which has awesome Valcona leather and the results were awesome.

Q7 leather BEFORE
htviDrJ3Px6BXhL2qHyqTdw=w1230-h923-s-no?authuser=0.jpg


Q7 After
ZUp__ANtfNKuLKv60qWUxvA=w1230-h923-s-no?authuser=0.jpg

qDIwYA_UQWWrjsGPPq1OCew=w1230-h923-s-no?authuser=0.jpg


Shortly after coating all of the leather in Leatherique I realized I wasn't sure is Dakota was even real leather. As it turns out it's a real leather but has a coating on top which renders Leatherique not as effective. Thankfully my leather is perforated so the cleaner can penetrate there. I followed through with the procedure knowing it's unlikely the results would be as spectacular and in the end I am happy with the results but this really makes me want to track down an X5M interior with Merino leather. No doubt the Dakota is durable but I am not a fan of the way it feels, it reminds me of Crayons and plastic.

Anywho, back to pictures!
9b56JoWLPTKRI3EpkP6lb9Q=w1230-h923-s-no?authuser=0.jpg


Here are BEFORE photos
8KSYUZT_p46BSoNQ-u21lPQ=w1230-h923-s-no?authuser=0.jpg

EYP1wMzFiGKjOpcj1ym7i0Q=w1230-h923-s-no?authuser=0.jpg

D8s1afZ26pTe9B3WmHd7HyQ=w1230-h923-s-no?authuser=0.jpg

21mErsh91eWEhgsSo0vwkTw=w1230-h923-s-no?authuser=0.jpg


Leatherique Rejuvinator applied. 2.5 coats and let it sit overnight.
pKjDPE4c724Pss_JfHHi4UA=w1230-h923-s-no?authuser=0.jpg

0gfNpJjVlYWL3kvjh2SEWBQ=w1230-h923-s-no?authuser=0.jpg

K39U-gDGfBBEqo0vwoQKiXA=w1230-h923-s-no?authuser=0.jpg


Leatherique Pristine Clean applied and then leather was agitated with a horse-hair brush, wiped, and buffed. It's always a fun transformation to observe, notice how the leather has a nice matte finish.
uc_WyGDZF6ibpCCy8HYSB-w=w1230-h923-s-no?authuser=0.jpg

iieHEa5ba64NBUntQ4-fDZw=w1230-h923-s-no?authuser=0.jpg

aSEwK_ApNiJi3c4xmoAsjBg=w1230-h923-s-no?authuser=0.jpg


Steering wheel stitching before
B1OiVRSexYpzV_Udn8qo0lA=w1230-h923-s-no?authuser=0.jpg


Stitching after
Veee94NDCgnDO5Wnc3__MVw=w1230-h923-s-no?authuser=0.jpg


Wheel after. There is still some shiny-ness (dirt and grease) up top so I may reapply later but overall it's a dramatic change.
gkeKhXlQG8UJ7TaeW97rucw=w1230-h923-s-no?authuser=0.jpg


Bucket before cleaning driver seat and steering wheel
gOASCcdFjViUSA6W869OSXg=w1230-h923-s-no?authuser=0.jpg


...After
hOp2N-yaaX7khErWOlVIkcA=w1230-h923-s-no?authuser=0.jpg


Pokey pokey!
r6lia3icpo2GXHmkXi-3bVQ=w1230-h923-s-no?authuser=0.jpg

P_zS4oPtzfQjX1o_ckgHozw=w1230-h923-s-no?authuser=0.jpg

35Nt8G_QrFmD_oZ6ImG5Uhw=w1230-h923-s-no?authuser=0.jpg


Rear seat During/After
ykQjLCzO-hH9Y0moQFnLG8w=w1230-h923-s-no?authuser=0.jpg


AFTER
PSaT5I0ITQxm_629dO-dFZA=w1230-h923-s-no?authuser=0.jpg

wYAqh6v5ggX6NRW33v0afUw=w1230-h923-s-no?authuser=0.jpg


New strut mounts arrived. I couldn't find my OEM strut dust shields/washers and FCP/BMW wanted $35 per washer *pfft* get outta here, to the local yard I went for some recycling.
GHgkxt1sxUsx02UfYKyVUOQ=w1230-h923-s-no?authuser=0.jpg


New strut mounts AND WASHERS installed, we're back in business.
eCOxqlAQ9sXEy5fXoVhtskA=w1230-h923-s-no?authuser=0.jpg


Yea, that's some nice rubbing. You gotta pay the the 295/45/20 tax in order to enjoy the benefits of those cushy sidewalls.
nBCpx_NPOg6SrsSjwQAO3Aw=w1230-h923-s-no?authuser=0.jpg
 
  • Like
Reactions: Torgus

TwinTurboWagon

Corporal
Nov 7, 2016
223
241
0
San Diego
X5 has been chugging along being a versatile beast, currently approaching 135,000 miles young. The pile of parts for maintenance/mods has been growing and I am looking forward to diving into a couple projects when time allows.

Here are some snaps of the X5 with some Fall colors.
ZU0wqUfP9H9JXV621hRA=w1230-h923-s-no-gm?authuser=0.jpg

GtbD-thpq6kwBGp9F6hA=w1230-h923-s-no-gm?authuser=0.jpg


E70 x Colorado Mud - artist collaboration....
d4qKBJhZ8LghJc_VzM0A=w1230-h923-s-no-gm?authuser=0.jpg

b4WYbvmiWGAqm2NlJvoA=w1335-h923-s-no-gm?authuser=0.jpg

gwhhVvT7W155LMweW5fA=w1200-h600-s-no-gm?authuser=0.jpg


Fall turns into Winter
mKYA89EBCKvmEmjXJbwQ=w1230-h923-s-no-gm?authuser=0.jpg

OrKat656dv2xDjawUyWg=w1230-h923-s-no-gm?authuser=0.jpg

sVZ_Zc55udJouygovtkg=w1230-h923-s-no-gm?authuser=0.jpg


My plan was to collect/build a 20x10 square setup of OEM Style 343Ms from an F10 M5 (4 rears) but deals weren't really popping up and now winter is eminent and I decided to settle for a more conventional set of wheels.

I found a set of OEM Style 611M (F85 X5M) locally. Not an ideal setup for winter due to the wide rears. 20x10 F and 20x11.5 R Listing photo didn't inspire confidence but I am glad I went to go check them out. They were being sold by a high end used car dealership and these wheels were a second set for an F85 that was traded in. The wheels were dirty and had some very minor blemishes but met my high quality standards which was nice as I won't need to fully recondition and powdercoat them. Price was right.

The wide rears aren't ideal for winter duties but the worst part of these wheels are their weight, they're are chunky bois.

Here is the original listing photo.
zegUzzpasGFSITc6hFDlw=w960-h720-s-no-gm?authuser=0.jpg


Original worn summer tires removed.
b3DBQ1t-Sz2_79HKCIQg=w1230-h923-s-no-gm?authuser=0.jpg


Bath time
2y4b271mN5V4YksfKbAw=w1230-h923-s-no-gm?authuser=0.jpg


Thankfully I am a BMW parts horder so I had a set of 68mm center caps laying around.
vHkeX2-eUGMuG2GAjl8w=w1230-h923-s-no-gm?authuser=0.jpg


Moment of truth....
....ooof!
XLga0VNepuwx6VZ6Px9A=w1230-h923-s-no-gm?authuser=0.jpg


OOOOOOF!!!!
YTdgLLNwttq1YZa8D9cQ=w1230-h923-s-no-gm?authuser=0.jpg


2 wheels had very light rash and some light sanding was enough to clean most of it up. I also used a ceramic spray coating on them to help keep them slick to make winter clean up easier. Now we wait for tires, I will be running 275/45F 305/40R which is slightly narrower than stock sizes but aspect ratio is bumped up one size for more meat/cushion. Going with Michelin Pilot Alpin 5 SUV.
EgCRunuOW1idY7RQTgNw=w1230-h923-s-no-gm?authuser=0.jpg

Pns07m3v-HADs-Zydc1A=w1230-h923-s-no-gm?authuser=0.jpg

vZADFOcNk2z3BYqiZ8Rg=w1230-h923-s-no-gm?authuser=0.jpg

SOpuUvI9vHyaiwowx0-A=w1230-h923-s-no-gm?authuser=0.jpg

DTToL9LuQAKodqdVReVw=w1230-h923-s-no-gm?authuser=0.jpg

GCTCOMHXePCeL9J3GkXQ=w1230-h923-s-no-gm?authuser=0.jpg

9xC3pRYzR6AQABdy5Psw=w1230-h923-s-no-gm?authuser=0.jpg
 
  • Like
Reactions: wheela

TwinTurboWagon

Corporal
Nov 7, 2016
223
241
0
San Diego
Feels weird to throw the winter setup on the X5 when it was 68F outside but that's Colorado for you. 5-7" expected for Christmas and no, that's not an inappropriate joke. hehehaha!

With the changing of the wheels I took the opportunity to swap my spherical front thrust arms for some OEM hydro/rubber units. With the rough paved roads and frequent trips on dirt fire roads here in CO the added isolation and comfort from the OEM arms is welcomed.

I was chasing down some front end clunks which ended up being a loose bolt on the lower control arm. I also found the driverside sway bar bracket was missing on of it's bolts ...whoops. This explains not only the clunk but the very "tilty" side to side weight transfer. Hard to say how long this has been loose but my guess is quite a long time, like years as I clearly remember the clunking when driving offroad in Sedona to take engagement photos circa 2020. This sway bar bracket bolt was originally removed and reinstalled with a coolant hose clamp under it during the ATM intercooler install I assume that and the improper bolt torque led to my years of suffering listening to clunks. Should be good now!!

Y3oglSVpWBCEQoMwrCtg=w1215-h911-s-no-gm?authuser=0.jpg


I snagged a set of Michelin Pilot Alpin 5 SUV tires used and the fronts had decent tread (8/32") but the rears were questionable so I ended up buying a new pair of rears. I ended up finding a few online retailers selling them for $131/ea and my local Discount Tire which is handling my tire swaps was able to price match even though they throw their mandatory and overpriced tire insurance in the mix at $75/tire. Nonetheless I am optimistic for these tires given their sporty demeanor and initial impressions on ride quality is very positive, curious to see how they perform in real snow.

I went with 275/45/20 405/40/20 The tires in this size are actually an OEM "NO" variant and are built for E3 Cayennes. In predictable form I up sized the aspect ratio for a bit more cushion and fill of the fenders. Working within the constraints of tire options and <1% rolling diameter delta F/R for the X-Drive this is what worked. The 305 is a bit stretched on the 11.5" wide rear wheel but whatever.

Summer/All Season setup for reference
hvg-bCOLBRJku2disNqg=w1215-h911-s-no-gm?authuser=0.jpg


Fronts
HiKCJ6ZI0VHotzGuRe4g=w1215-h911-s-no-gm?authuser=0.jpg


Rears..... WOOOOF!!
ari0w6AV7MbdbNtKGzcA=w1215-h911-s-no-gm?authuser=0.jpg


High contrast vs Low contrast
Xkb5d1Z2ItUu3AAYpylA=w1215-h911-s-no-gm?authuser=0.jpg


Although the OEM X5M wheels are painfully heavy the silver lining is they are made for X5s so I am able to ditch the monster 30mm rear spacers that accommodated Camaro wheels.
onLTy7hErQFu75FOb8Yw=w1215-h911-s-no-gm?authuser=0.jpg

bNcIdIxatN_E_OKPexuw=w1215-h911-s-no-gm?authuser=0.jpg


Took some time to fluff and buff the studs to keep the threads clean.
hz_RxaqedW_PHIFny_Uw=w1215-h911-s-no-gm?authuser=0.jpg


Studs remounted and 12mm spacer installed
6HMhLsnMXCvVAcdr_XZw=w1215-h911-s-no-gm?authuser=0.jpg

R3qkjvzFOAPlbuJ9ZX9Q=w1215-h911-s-no-gm?authuser=0.jpg


I kept the KWs are max ride height to see how I got on with the new setup and see if I could get away without lowering it. Excessive fender gap is offensive and I have standards. It was looking pretty good.
Wjq-tgs2euTILh50Uf_A=w1215-h911-s-no-gm?authuser=0.jpg


Then, when walking out from a store the light was hitting the tires just right to highlight that I did indeed need to lower the X5 a bit. Look at that rear fender gap "Ewww David!"
RACxglZbM6p-Pn5MscaA=w1215-h911-s-no-gm?authuser=0.jpg


KW adjustment range is 235mm-260mm in the front (measured from strut pinch bolt to top of threaded KW collar. I went from 260mm down to 245mm. Rear links lowered to match. This gave me ~6.25" from top of wheel to lower edge of fender flare. Originally I had 10mm spacers up front but it offered a little too much poke relative to the rear so that was dropped to 5mm. 5mmF 12mmR
Much better.
9q8ALOY1kyICpKvtfeYw=w1215-h911-s-no-gm?authuser=0.jpg

V-zq8unaD-23C08Hjizw=w1215-h911-s-no-gm?authuser=0.jpg

GnE0DKTpGgbzv8N7zfJQ=w1215-h911-s-no-gm?authuser=0.jpg
2OmlWabtfUf_Nm7DSShg=w1215-h911-s-no-gm?authuser=0.jpg


I particularly enjoy this photo since it shows off the stance/wheel offsets but also to the enthusiast's eye you may notice the custom cold air intake, the LED light bar, and the upgraded intercooler peeking through the grills.
DYBKdHLzI58PBzoB7wkw=w1215-h911-s-no-gm?authuser=0.jpg


I will admit I do appreciate the contrast the Style 611M wheels offer and I think the machine/gunmetal finish pairs well with the platinum grey metallic paint. Also, the machined wheels help tie in the chrome/silver headlights and aesthetically it all works pretty well. Definitely OEM+
Here are a couple collages showing the ride height Before/After

Happy Holidays!
HjD6tfBiYIjra0Fkoky_A=w911-h911-s-no-gm?authuser=0.jpg

Qe-_7OxYPeqJViNWyYGGw=w911-h911-s-no-gm?authuser=0.jpg
 
  • Like
Reactions: wheela

TwinTurboWagon

Corporal
Nov 7, 2016
223
241
0
San Diego
After getting the winter setup installed and KW adjusted down I got an alignment done (lifetime at Firestone) and the results weren't great regarding camber. The E70 lacks useful adjustment in the rear and has no camber adjustment up front, not ideal when you are lowering a vehicle.

Previously I installed Meyle HD upper wishbones with a camber adjustment but never adjusted them. I also snagged some SPC upper trailing control arms for the rear and a magnetic camber gauge so I could crudely DIY this and see the improvement.

Here are my "before" at-home measurements:

FL -2
FR -1.6
RL - 4.2
RR -4.1

"After" at home measurements:
FL -.6
FR -.5
RL -1.75
RR -2.2

"After" according to Firestone:
9OA4_DGrpbsbD5TV9tSA=w1215-h911-s-no-gm?authuser=0.jpg


I asked for them to set total F/R toe to .02 instead of .2 and they weren't able to oblige. "We got as close as we could." But I've seen many posts of E70s getting the toe down to .02 so I know it's possible. I might go to another, more competent Firestone ....if such thing exists.

Precise science! Garage floor level?
Qu5DmChd6O21eqZPnFNQ=w1215-h911-s-no-gm?authuser=0.jpg


...kinda
qfaQ72N1S0ka1dbgaxRQ=w1215-h911-s-no-gm?authuser=0.jpg


SPC control arms
FR7CJvuH_UkQMflPdQMA=w1215-h911-s-no-gm?authuser=0.jpg

maypwXRE-klRcPwIGqWg=w1215-h911-s-no-gm?authuser=0.jpg


Here is a look down at the top of the Meyle HD upper wishbones on the front. This is there "normal" position before.
5wtToCkiuHoNLa3jLFDQ=w1215-h911-s-no-gm?authuser=0.jpg


...and after with + camber maxed out. I couldn't find info online with their adjustment range but I think it is +/- 1 degree.
4uh-iKR_too9Kr8EBLEQ=w1215-h911-s-no-gm?authuser=0.jpg


I also installed a new K&N filter, hydro sock, and cleaned the MAF. Performance greatly improved after this. I think I over-oiled my K&N previously and Colorado grime was clogging it up. I now have a significant performance gain, like >30% power. Whoops! Once I get ISTA properly installed I will reset the MAF and injector mean as well. I've never done this even with my various intake setups.
hqV3uDewk5qR7cTwvFZA=w1215-h911-s-no-gm?authuser=0.jpg

K6jnYhB_-1tMI3smli9g=w1215-h911-s-no-gm?authuser=0.jpg


Local LKQ had a couple E70s so I grabbed a couple trim pieces I needed to replace broken ones and I also stumbled upon this tray/insert for the center console.
B7auqYXef3M4G-oYa1ng=w1215-h911-s-no-gm?authuser=0.jpg


Living a life of true luxury ...with my Carmex in a secure spot. Colorado shit.
TzCKwACsonj2JCiLmhGQ=w1215-h911-s-no-gm?authuser=0.jpg

VD8_WI78qz91k54vo7UA=w1215-h911-s-no-gm?authuser=0.jpg


With temps dropping my battery was showing weakness. A bit annoying as I was trying to adjust my rear ride height via air suspension and sensors and the battery died, adding insult to injury my fancy-pants Schumacher INC-700a charger isn't powering up so I was forced to use my mobile power station / car jumper but it wasn't allowing the jump and stating the battery was in a protection mode. I was able to recover the battery over night with my trickle charger but the real solution was a new battery.

Current battery was installed shortly before I bought the vehicle ~5 years and 55k miles ago. It was an AC Delco 49AGM. 95AH 900CCA. It aside from the drop in performance with ambient temps around or below freezing it has served me well.

Replacement is Super Start AGM. 105AH, 950 CCA
pkm7MWor6XV10txllYMw=w1215-h911-s-no-gm?authuser=0.jpg


Turns out when the last battery was installed it was never registered to the vehicle so the X5 thought it has a 105AH and it really had a 95AH. That has been corrected.
cFBox1kBt6wKLNFUTuHA=w1215-h911-s-no-gm?authuser=0.jpg
 
  • Like
Reactions: wheela

TwinTurboWagon

Corporal
Nov 7, 2016
223
241
0
San Diego
I decided to try a different intake setup. My cold air intake has served me well over the past 4+ years but I wanted to try something with better filter protection. Now that I live in Colorado (previously San Diego) I find myself driving more off road and in winter conditions where there is exponentially more airborne dirt and grime. Yes, I know there is the OEM intake I could reinstall but that's so boooooring.

Intake was mostly inspired by the system I built for my N54 which utilizes the same filter and velocity stack.
zoA4cQj4k0G2A9ACR38g=w1215-h911-s-no-gm?authuser=0.jpg


"Less is more" was the mindset of this intake with the priorities being to minimize restriction and keep airflow smooth entering the MAF. Aside from having the outlet of the velocity stack slightly ovalized to perfectly match the MAF, this is as good as it gets. The bonus of the minimalistic design is a shorter and less expensive parts list.

Measuring hood clearances, it will be tight but possible!
Tiyxh5q_bK_wRj6NbsdA=w1215-h911-s-no-gm?authuser=0.jpg


RACE TROCK!
3HsM-v_GwUvOUIk7tlrg=w1215-h911-s-no-gm?authuser=0.jpg


The straight coupler's 4" length was a bit too tall and I needed to position the velocity stack as low as possible so I cut it down to 3". The filter literally has millimeters of clearance around it and when the hood is shut the padded insulation on the bottom of the hood juuuuuust barely touches the top of the filter. The insulation has maybe 3/4" of give to it so I don't foresee any issues with the tight clearances and the engine movement while under load but it is something I will keep an eye on.
3aq756pH6HNKtusxqUOg=w1215-h911-s-no-gm?authuser=0.jpg

KS8xUwB6kZyIv8WOL9BQ=w1215-h911-s-no-gm?authuser=0.jpg


~$200 worth of parts:
Vibrant 10960 Filter
Vibrant 10592 Velocity Stack
3.5" Coupler
3.5"-3" Reducing Coupler
HPS Worm Gear Clamps
VAucxaReGA1zzBKHxKAQ=w1215-h911-s-no-gm?authuser=0.jpg

hou430KTPkjSBSa3v8Xg=w1215-h911-s-no-gm?authuser=0.jpg


For those who aren't familiar the Vibrant filter and velocity stack are designed to work together.
Oo432MFdUOGfswwGGd0w=w1215-h911-s-no-gm?authuser=0.jpg

TR-eYEq3C6rH3fFgJvFQ=w1215-h911-s-no-gm?authuser=0.jpg


This filter is really stuffed into the engine bay so there were a couple modifications to accommodate. I used a large zip tie to pull the AC line out of the way and then my 335D engine cover needed a slight trim.
u-10RrYU2CvXUU2vm8GoA=w911-h911-s-no-gm?authuser=0.jpg

DrUYGVkUKv6S6wqIo2-w=w1215-h911-s-no-gm?authuser=0.jpg


Finished product (for now). Initial impressions are very positive. Overall in the intake performs just like the cold are intake with excellent response. The most noticeable difference is the added induction noises in the cabin; the *whooooses* *psst pssts* and *wuhbuhbuh* is easily heard from the driver's seat. Some might find it annoying but I love hearing what the turbos are doing. There is still plenty of noises heard from outside the vehicle as well.

I am very aware that this intake will be pulling warmer air from the engine bay and that was a sacrifice I was willing to make in exchange for the filter protection and turbo response. I plan to install an air scoop which will direct cold air towards the filter. I may also entertain building an additional heat shield to act as a partition between the filter and the exhaust manifold and turbos.
9SFrVBYOpACy56Ts9Geg=w1215-h911-s-no-gm?authuser=0.jpg

rmCzcfPmFhnl5QVpZTlQ=w1215-h911-s-no-gm?authuser=0.jpg

_Bhrhn2tUulYStGJMKXA=w1215-h911-s-no-gm?authuser=0.jpg

mLg7LTeDUcZ1p4ksDqgQ=w1215-h911-s-no-gm?authuser=0.jpg
 
  • Like
Reactions: wheela

CTP Cryo

New Member
Oct 20, 2022
3
1
0
A couple of things that you can do to keep the heat down is also Ceramic Coat the hot side of the turbo as well....

Once you do a heat shield you can also ceramic coat the outer side of the shield as well... Of course as long as its sealed it might just work really well.
 

TwinTurboWagon

Corporal
Nov 7, 2016
223
241
0
San Diego
A couple of things that you can do to keep the heat down is also Ceramic Coat the hot side of the turbo as well....

Once you do a heat shield you can also ceramic coat the outer side of the shield as well... Of course as long as its sealed it might just work really well.
Yup, I already have a ceramic coated exhaust manifold sitting on my desk ready to go in when I have some time and if I get around to building a heat shield I will have that coated as well. I did this on my E61 where I bought a manifold heat from RB, modded it, and had it coated.
LzTKFYyZantTh-AJ9PWc=w1215-h911-s-no-gm?authuser=0.jpg
gt0YdKYhpDw_wVIje4NLU=w911-h911-s-no-gm?authuser=0.jpg
 
  • Like
Reactions: CTP Cryo

CTP Cryo

New Member
Oct 20, 2022
3
1
0
Since you're into more Power to the ground while also getting great MPG, I do have an upgrade suggestion.. Not Cheap per se but a long term solution thats used by drag racers and Bonneville guys. Ceramic wheel bearing retrofit.. If you're interested: https://www.performancebearing.com/

This trans shop bought out the business from the original owner Jack Wilson who had been developing ceramic bearings for over 25 years.
 
  • Like
Reactions: TwinTurboWagon