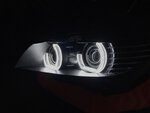
E89 E89 Z4 halo DIY - possible takers?

fmorelli

Lieutenant General
Staff member
Aug 11, 2017
3,764
3,624
0
58
Virginia
Ride
E89 Z4 35i, F10 535d
I'm knee deep in too many projects, but just talked to Zaki on Facebook that has "fixed" the strong halo/weak halo setup on the Z4 without spending a gazillion dollars on sending headlights to someone for complete refresh. Basically the parts are $45 and the results look great. He said the headlights come apart with a hair dryer and a bit of patience. They are silicone sealed. Has to go back together with silicone.

I would tackle this but I have way to many parallel projects in flight right now. It would be GREAT if one of the Z4 guys here would sign up to tackle this as a DIY thread, and pave the way with some content on doing this. I have access to the guy that already did it, if questions are necessary. Here's the results and where to buy the rings:

https://www.aliexpress.com/item/32947747858.html?spm=a2g0o.cart.0.0.35493c00sRH3yA&mp=1

96276585_10207854447514882_4842755306196828160_o.jpg


96066457_10207854447874891_6726936611180773376_o.jpg


Anyone willing to give this a try and post up some process and photo DIY?

Filippo
 
Last edited:

fmorelli

Lieutenant General
Staff member
Aug 11, 2017
3,764
3,624
0
58
Virginia
Ride
E89 Z4 35i, F10 535d
I ordered the lights - cheap. I'd like someone to DIY this with a few photos and pointers. I won't get to that for a while, I'm afraid. I'm already with a backlog of stuff to post that I'm now trying to push out. C'mon somebody get motivated to do this and post about it.

Filippo
 

fmorelli

Lieutenant General
Staff member
Aug 11, 2017
3,764
3,624
0
58
Virginia
Ride
E89 Z4 35i, F10 535d
Just posting up what Zaki provided me on Facebook. See below.

Filippo

--- cut here ---

So this is my breakdown of the process.
1. Remove the front bumper for ease in unscrewing the headlights themselves.
2. Once headlights are removed get a towel or a thick piece of cloth and put the headlight on it in order to not damage it while moving it around.
3. Use a hairdryer along the outline of the headlight where the silicone is in place, that will be the black plastic section connected to the plastic lens itself. Keep in mind that the silicone is thick and deep you don't worry if it takes time.
4. Make sure you spend a decent amount of time along the outline for the silicone to melt properly or you may damage and crack the plastic when removing it. Also remember to slowly pull it apart, not all at once.
5. Once the plastic lens is off carefully take all the layers of the headlight apart. There are 2 plastic layers inside which hold it together with several plastic components for the projector and signal indicator.
6. Make sure you keep all the components in the right order so you can place them back after taking them apart.
7. Use superglue or double sided tape to stick the LED rings onto the ring outlines around the projectors.
8. Once this is done let it dry for a good 15-30 minutes to be safe.
9. Now you can place all the components back together, keep in mind you'll have to put some of the components back in place before sticking the LED's on or else they don't fit. Don't glue anything until you get the fit right.
10. Once you've done this you can stick the caps back on and make sure to tighten it properly with industrial grade silicone.
11. The LED's have wires connected to them which you connect to the wiring of the cars DRL system. It's fairly obvious to stop, right under the dust cap. Drill a hole in the dust cap to stick the LED wiring through in order for it to reach the cars wiring. Then put silicone to cover the drilled hole with the wire though it.

Enjoy your new DRL's!

95613723_10207859755647582_728478113268236288_o.jpg
96106029_10207859756127594_1051085321757786112_o.jpg
 

Tzaks

Specialist
May 30, 2019
53
18
0
Ride
35i e89
I have been running these for over a year, I think they are the best angel eyes for the z4.
 
  • Like
Reactions: fmorelli

fmorelli

Lieutenant General
Staff member
Aug 11, 2017
3,764
3,624
0
58
Virginia
Ride
E89 Z4 35i, F10 535d
I ordered a pair and they should arrive any day.

Filippo
 

fmorelli

Lieutenant General
Staff member
Aug 11, 2017
3,764
3,624
0
58
Virginia
Ride
E89 Z4 35i, F10 535d
Slow boat from China, in many ways. These arrived yesterday. On the backlog of projects to do, eventually.

Filippo

WhatsApp Image 2020-07-03 at 6.15.39 PM.jpeg
 
  • Like
Reactions: doublespaces

Osiris

Specialist
Sep 19, 2019
83
13
0
South Africa
Ride
2009 E89 BMW z4 35i DCT
So I did a halo retrofit on my Z4....Results looks amazing but I will never do it again as long as I live. The lights on the Z4 are sealed by the power of grey skull and you basically end up butchering them to get them open :( These are not sealed with Butyl like the E92 its sealed with a glue called perma seal and let me tell you that stuff lives up to its name.

I have retrofitted projectors and angel eyes to many many vehicles and bikes over the years. nothing comes close to the annoyance and difficulty of opening the E89 headlights.

I have a build of this on another forum. will have to find the link if you're interested to see how I did this all.


2019-02-15 21.45.35.jpg


IMG_1616.jpg


highChrome.jpg
 
  • Like
Reactions: fmorelli

Osiris

Specialist
Sep 19, 2019
83
13
0
South Africa
Ride
2009 E89 BMW z4 35i DCT
I decided to find my DIY and saved all the pics to put up here.

clkc7862_9926934945.jpg


Roll of Butyl glue I ordered to reseal the headlights with. Don't use silicon because if you need to reopen the headlights again you will kick yourself.
img_4415_9290577690.jpg


img_4417 - copy_3735043792.jpg


img_4418 - copy_8536670608.jpg


img_4419 - copy_689440462.jpg


img_4421_6131781251.jpg


img_4422_2730464353.jpg


img_4423_6163146635.jpg


img_4424 - copy_7167246211.jpg


img_4425_9865385610.jpg


img_4426_5553901530.jpg


img_4430_5647528902.jpg


img_4431_705597056.jpg


img_4434_1630421555.jpg


Blacking the inner chrome bits out.
img_4438_7919509191.jpg


I blacked this out too.
img_4443_9290962563.jpg


img_4446_1676032226.jpg


old vs new.
img_4447_2530021760.jpg


old vs new closed up.
img_4457_6218893192.jpg


Decided to clean up the hazing of the projectors. old...
img_4459_2351299570.jpg


Cleaned up like new.
img_4460_2002093959.jpg


Nice neat install for the halo power unit.
img_4463_4291086015.jpg


img_4471_1473051304.jpg


img_4472_9460673308.jpg


img_4509_7957480135.jpg
 

Attachments

  • img_4454_2380433105.jpg
    img_4454_2380433105.jpg
    126.3 KB · Views: 7
  • Informative
Reactions: fmorelli

fmorelli

Lieutenant General
Staff member
Aug 11, 2017
3,764
3,624
0
58
Virginia
Ride
E89 Z4 35i, F10 535d
Very nicely done and thank you for sharing the photos. A few questions, if I may:
- do you have a link to the specific halos you used?
- maybe a link to the butyl seal as well?
- any specific guidance on pulling apart the lights? I've done some as well - my worst fight was a 2003 E39 ... turns out the only E39 year which was sealed differently.

Looks fantastic. Thanks!

Filippo
 

Osiris

Specialist
Sep 19, 2019
83
13
0
South Africa
Ride
2009 E89 BMW z4 35i DCT
Very nicely done and thank you for sharing the photos. A few questions, if I may:
- do you have a link to the specific halos you used?
- maybe a link to the butyl seal as well?
- any specific guidance on pulling apart the lights? I've done some as well - my worst fight was a 2003 E39 ... turns out the only E39 year which was sealed differently.

Looks fantastic. Thanks!

Filippo

Thanks man, appreciate the compliments.

I unfortunately don't have a link to the halos I used, I bought them from a shop here in South Africa called Violet Electronics. But I have seen very similar sets available on ali express. I did this for someone who had an E90 LCI, he ordered the halos off ali express. The wiring harness was horrible and they were not as bright so I would look for the kit that has the same power unit as mine in the photo.

The butyl seal I just bought here: https://www.gluedevil.co.za/products/tapes/butyl-8x8-tape

You need allot of patience and allot of heat! also you need those expanding Pliers the one I arrowed and the tools I circled, the plastic trim tools will also come in handy.

CNIKESIN-Auto-Interior-Removal-Repair-font-b-Tools-b-font-Fastener-Clip-Pliers-Car-Door-Panel.jpg


The best way to do this is put the headlights in the oven and keep an eye on them, I cant remember what temp I put it at as I basically did it by feel, around 110 - 150 Celsius for around 15 - 20mins to get the headlights equally heated. then you need to use a heat gun, a hair dryer wont cut it, not for these headlights! maybe if you lucky and the perma seal wasn't fused by grey skull himself?

Go around the entire headlight with the heatgun and concentrate more on one corner of the headlight and begin pulling and prying till it starts to give way and get the pry tool in there, it will fight you! once its in one side use the heat gun and little bit by little bit push the prytool along while expanding and heating, don't heat too much as the plastic will bubble fast, also don't pull on the light too hard as you will get stress marks.

You will get it open, to give you an idea it took me a total of I think 4 days for this project, I am very OCD, I want stuff to look factory, I don't like wires all over the place and ugly cuts.

you do need to cut the lights as the edge of the halos do collide with the inner housing so get a very small cutting bit for your dremel and cut little by little, this process took me the longest as I didn't want anything to be visible when it was all assembled.
 

Osiris

Specialist
Sep 19, 2019
83
13
0
South Africa
Ride
2009 E89 BMW z4 35i DCT
These are the cuts, the inner one was difficult to get right due to where it is, your basically cutting that removable plastic shroud. the second cut I did on the other headlight was neater. but regardless you cant see this once all fitted unless you really go close up and look for it.
cuts.jpg
 
  • Like
Reactions: NoQuarter

fmorelli

Lieutenant General
Staff member
Aug 11, 2017
3,764
3,624
0
58
Virginia
Ride
E89 Z4 35i, F10 535d
Very nice ... great attention to detail as well, @Osiris. If you happen to see a representative link on Aliexpress, that looks like what you installed, please share. I have a round set which I like as a period correct look, but I have to say these look great. I normally don't like the "make it look like a later model care" thing ... basically screams, "I can't afford a new BMW" to me. But the way you did it, with the black out and such ... really elegant look!

Filippo

p.s. For those in the USA, you can buy Glue Devil directly. There are other choices in the USA as well. The no excuses pick would be the 3M butyl which is about $25 for a roll. For half that, this will do it as well.
 
Last edited:

Eracer76

Private
Feb 9, 2017
44
58
0
Ride
2009 Z4 35i
I have the same exact angel eyes for sale if anyone wants them. They're still new and have never been installed. $75 shipped in the 48 states


IMG_2359.jpg
IMG_2361.jpg
 

Osiris

Specialist
Sep 19, 2019
83
13
0
South Africa
Ride
2009 E89 BMW z4 35i DCT
There we go! rather install those. These are very good quality halos and the ballasts make for a very neat install.