This is the most comprehensive guide on the internet as far as I have seen, if you don't care about how we got to this point, skip down to "Getting Started".
There is plenty of information floating around but the information is scattered everywhere, I figured it would help if I documented the process in detail while I installed this to my E93 335i.
For an explanation of the different brake caliper/rotor combinations for sourcing parts: https://bmw.spoolstreet.com/threads/what-is-the-best-bbk-for-the-money.1066/post-23497
I started by purchasing the F30 M Performance Brake Kit, I got the Phoenix Gold version for $1229 shipped from BMW of El Cajon on Ebay. These kits do not come with rear rotors, which is okay because of two reasons:
1) The F30 rear calipers sit too low when mounted to the E90 knuckle and the F30 rotor hits the inside of the caliper.
2) The F30 rotors are offset by about 3mm and the rotor is not centered properly inside the calipers
The proposed solutions to these problems involve a combination of various things which include the elongation of the steel knuckle holes to move the caliper up, or grind the inside of the caliper to make clearance for the F30 rotor or using aftermarket E60 rotors which barely fit inside the caliper with an offset pad sweep. None of these options are very good and those methods have changed over time so this guide has been updated to reflect the easiest options.
By using the E60 rotor with an eccentric bushing, you don't need to machine the caliper ear, you don't need to elongate the knuckle bolt hole for an accurate pad sweep, you don't need to down size the caliper bolt holes with a timesert, and you don't need to grind out the inside of the caliper well to make room for the rotors. For anyone still wanting to use the F30 rear rotors or just don't trust the use of an eccentric bushing, it is recommended you purchase the caliper bracket modification from a company such as EOSpeed. The ear is cut off cleanly and a new ear is securely bolted in place which is stronger than the eccentric bush or milled caliper ear options.
Now, with all of that said, the simplest way to get the F30 REAR brakes on the E9X with a proper pad sweep is to purchased a set of E60 Zimmerman blanks and use the eccentric bushings which will be explain in this guide.
EDIT: This spoiler text is superfluous and only kept for historical purposes.
Getting Started:
Now that we've decided to use the E60 rotors, there is a seller called DRT-Euro on Ebay and I asked them to dimple and slot them like the BMW M Performance rotor pattern. When I got them back, there was a difference between the slotting and dimple styles but I figured they were good enough and someone might not ever notice without close inspection. The Zimmerman rotors were a one-piece design, but since they are rear rotors and I wasn't going to be doing any tracking with the car, it is acceptable to me. These rotors were only $204 shipped.
The next step is to purchase an Eccentric bushing from a guy in Poland (He only takes western union/bank wire, details are posted later in the thread) and press the M12 bushing out and put the offset M10 bushing in.
If you don't do this the pad sweep won't be good and depending on the E60 rotor you purchase, it may have contact issues on the inside of the caliper. If you purchase OEM E60 rotors instead of the Zimmerman, the height of them is actually taller by a couple mm and this means the caliper may still require milled out on the inside.
Here is a picture of the eccentric/offset bushings installed:

Notes:
REAR BRAKES
If you want to test wheel rotation for dust shield scraping sounds, something that may end up being an issue; I recommend a lift due to the differential. Remove the left rear wheel and set it aside. I also recommend placing a card board box under the wheel you're working on, inevitably brake fluid will squirt out or drip in an unexpected place and this will keep it off your floors.

To minimize the brake fluid that leaks out, put a steering wheel lock or something heavy on the brake pedal. This will initially cause fluid to squirt out of course, but it does minimize the flow afterward:

Using a 14mm wrench, loosen the brake line that feeds the caliper, keep a rag and drip pan handy to catch the brake fluid. Then using an 11mm brake line wrench, loosen and remove the nut on the other end, be very careful you do not strip this soft aluminum nut. Once its released, pour out fluid into the pan and wipe off any spillage.
.jpg")
.jpg")
Use a screw driver to pop out the pad retainer:

(When you're doing the right rear wheel, you need to remove the brake sensor from the caliper, don't lose the clip, and disconnect it all the way back out of the way)
Looking down, you can see the two bolts on the back of the knuckle that hold the caliper on:

Loosen with a 16mm ratchet and the caliper should come off. If you put a brace on the brake pedal, I recommend grabbing a paper towel when doing this part so brake fluid doesn't shoot out onto your car when the pads get compressed. Once removed, grab one of the rubber plugs from your new calipers and stick them in the old calipers to prevent them from leaking on your shop floor.


Use an allen wrench to remove the key holding the rotor in place:

At this point you have to smack the rotor on the hat which is the inner circular area that sticks out. Not the very center where the nut is, but around the area where the lug nuts go in. Hit it a few times and the rotor should come off. If you can't get it to come out, you can buy or borrow a gear puller from Autozone. Be careful when using a gear puller, the rotor tends to fly off the hub. This was their 5 ton unit, it was barely large enough:


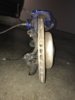
As you can see in the picture below, the dust shield obstructs the F30 caliper:

So grab some tin snips and cut away some of the dust shield and be VERY CAREFUL! This tin is incredibly sharp when you're cutting it and it would be way too easy to have your hand slip and slice one of the tendons in your fingers:


You may have to cut the dust shield toward the center which sits next to the ebrake. When you put it all back together you don't want to hear scraping sounds on the rotors like I did, the more you remove the better.
Edit: The below instructions in the spoiler are now obsolete
Some of the photographs from this point will show a caliper that had the machine work done on it. I had some special washers made for my bushings that 'compensated' for this removed material to make it behave like I had not done the machining, so just ignore it and pretend the caliper is stock again.
Next, press out the M12 bushings from the caliper and press in the M10 eccentric bushings you got from the supplier from Poland.
Photos: https://bmw.spoolstreet.com/threads...e-brakes-on-e90-e92-e93-guide.2941/post-88371
Once you have this finished you can go ahead and mock the caliper up onto the knuckle and make sure the dust shield doesn't hit anywhere. This step is really important otherwise you'll be hearing your dustpan scrap as you drive around and you'll have to come back here and do it again. The dust shield doesn't come off without removing the knuckle so its probably easier just to bash the shield in so it won't come close to the ebrake stuff.


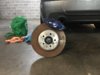
Next, install the E60 rotor and caliper:


Make sure the rotor is in the center of the caliper.


This is what happens when you try to use an aftermarket E60 rotor without an eccentric bushing. You can see how close the rotor is to the caliper:

Once fitment of the caliper has been confirmed, we'll need to put the brake pads into the calipers AFTER the caliper is mounted. Here is a demonstration of how the pins and clip work. With the caliper over the rotor:

First, slide in the brake pads with the compounds facing inward toward the rotors:


Then you place the clip down and slide one of the pins through the side of the caliper, into the brake pad and OVER the clip, through the other brake pad and into the caliper. I did not push the pin in all the way since its just a demonstration. You may need a small punch and a hammer to tap it through the other side. Push the other side of the clip down and do the same thing:


And this is what it will look like assembled, except the pins will be punched in all the way:


So go back to your caliper and put some brake paste on the back of the pads which will face the piston/caliper, away from the rotors as well as on the sides of the clip which press down onto the brake pads(not shown):
.jpg")
Now put these pads into the hole on the caliper, on either side of the rotor:

Now, install the clamp and pins as explained above. Once you have the first pin through both pads, grab a 1/4 drive socket that is smaller than the pin, place it on the end of the pin and use a hammer to tap the pin into place. A longer socket makes it easier to grasp:

Now do the same with the lower pin and the caliper is assembled:

Now install the brake line back onto the caliper end first with a 14mm, then do the other end with the 11mm brake line wrench.
Lastly, MAKE SURE YOUR WHEEL FITS! I scratched my caliper finish because the wider rotors put my calipers further out and it made contact with the spokes of my OEM 230 style wheels. I bought 5mm spacers to fix the problem, they barely clear as you can see in this photo:

When done with the rears, it will look like this:

Repeat on this entire process on other side.
FRONT BRAKES
Put the brace back on the brake pedal. Crack the front lug nuts, safely put the front end of the car on jack stands and remove the front left wheel.
Position a drip pan below the brake line and loosen the bottom portion feeding into the caliper enough so its loose. Then completely remove the top portion of the brake line, hold a paper towel around it to catch any fluid leaks. With this top end of the line removed, you can now twist and remove the caliper end, be ready to pour the fluid stored in the line into the drip pan.

Now remove the rubber grommets on the lines from the bracket and remove the brake line:


Remove the brake pad sensor if doing the front left wheel:


Put your hand on the brake pad retainer so it doesn't go flying, and pry it out with a flat head screwdriver:

Remove the two bolts on the back holding the caliper on and take off the caliper. Make sure to have a paper towel handy, as the caliper is shifted it likes to squirt fluid out of the newly exposed hole. Grab the rubber plug from your new caliper and stuff it in the old one to stop it from leaking everywhere.

Use an allen wrench and remove the allen key holding the rotor on. Smack the hat once again with a hammer to remove the rotor, or use a gear puller. Make sure you move everything out of the way, when the rotor breaks free it can be unpredictable:


Remove the dust shield:


Bolt the new dust shield on, only two of the original bolts will fit. Optionally, you may skip installing the dust shield as it has caused some tie rod rubbing issues for some people. On the bottom left hole, use a sharpie and mark the knuckle to get an idea of where the new hole needs drilled:


Take a measurement or just guess, hammer the marked location flat, drill the new hole and bolt back up to the knuckle:


Install the new rotor with the allen keeper:

Adjust the dust shield on top and bottom and bolt on the new calipers:


Apply the paste to the backs of the pads and the sides of the retaining clip that presses down onto the pads then insert into the calipers and secure just like the rears:


Install new brake pad sensor:


Connect the brake line and put the wheel back on, check clearances and repeat with the other side, and then bleed your brakes once again using the INPA method explained here: https://bmw.spoolstreet.com/threads/inpa-dsc-brake-bleed.3319/

You're done!
There is plenty of information floating around but the information is scattered everywhere, I figured it would help if I documented the process in detail while I installed this to my E93 335i.
For an explanation of the different brake caliper/rotor combinations for sourcing parts: https://bmw.spoolstreet.com/threads/what-is-the-best-bbk-for-the-money.1066/post-23497
I started by purchasing the F30 M Performance Brake Kit, I got the Phoenix Gold version for $1229 shipped from BMW of El Cajon on Ebay. These kits do not come with rear rotors, which is okay because of two reasons:
1) The F30 rear calipers sit too low when mounted to the E90 knuckle and the F30 rotor hits the inside of the caliper.
2) The F30 rotors are offset by about 3mm and the rotor is not centered properly inside the calipers
The proposed solutions to these problems involve a combination of various things which include the elongation of the steel knuckle holes to move the caliper up, or grind the inside of the caliper to make clearance for the F30 rotor or using aftermarket E60 rotors which barely fit inside the caliper with an offset pad sweep. None of these options are very good and those methods have changed over time so this guide has been updated to reflect the easiest options.
By using the E60 rotor with an eccentric bushing, you don't need to machine the caliper ear, you don't need to elongate the knuckle bolt hole for an accurate pad sweep, you don't need to down size the caliper bolt holes with a timesert, and you don't need to grind out the inside of the caliper well to make room for the rotors. For anyone still wanting to use the F30 rear rotors or just don't trust the use of an eccentric bushing, it is recommended you purchase the caliper bracket modification from a company such as EOSpeed. The ear is cut off cleanly and a new ear is securely bolted in place which is stronger than the eccentric bush or milled caliper ear options.
Now, with all of that said, the simplest way to get the F30 REAR brakes on the E9X with a proper pad sweep is to purchased a set of E60 Zimmerman blanks and use the eccentric bushings which will be explain in this guide.
EDIT: This spoiler text is superfluous and only kept for historical purposes.
Fitting the F30 rotors presents a number of challenges as the rear F30 calipers aren't centered on the F30 rotors when mounted to the E90 knuckle, so the calipers get sent out to Fab Factory to have the caliper mounting tabs machined down by about ~3mm off the ear of the caliper:
 If you want a perfect pad sweep, you will also need to elongate the knuckle hole because the caliper sits too close to the center of the hub and might hit the inside of the caliper.
The rear F30 calipers also use longer and wider mounting bolts(M12) than the E90(M10) knuckle. So even if you don't care about the pad sweep and do not elongate the knuckle hole, you will at least need to do one of two things:
1) Bore out the bolt holes on the knuckle(the knuckle is steel and I think this is shady) and then cut the bolt to length(Or finding a bolt the right size),
2) Buy 4x M10X1.5X11.0MM Part #101511 solid wall Timeserts and some red Loctite to reduce the F30 caliper threads down to the E90 size.
Getting Started:
Now that we've decided to use the E60 rotors, there is a seller called DRT-Euro on Ebay and I asked them to dimple and slot them like the BMW M Performance rotor pattern. When I got them back, there was a difference between the slotting and dimple styles but I figured they were good enough and someone might not ever notice without close inspection. The Zimmerman rotors were a one-piece design, but since they are rear rotors and I wasn't going to be doing any tracking with the car, it is acceptable to me. These rotors were only $204 shipped.
The next step is to purchase an Eccentric bushing from a guy in Poland (He only takes western union/bank wire, details are posted later in the thread) and press the M12 bushing out and put the offset M10 bushing in.
If you don't do this the pad sweep won't be good and depending on the E60 rotor you purchase, it may have contact issues on the inside of the caliper. If you purchase OEM E60 rotors instead of the Zimmerman, the height of them is actually taller by a couple mm and this means the caliper may still require milled out on the inside.
Here is a picture of the eccentric/offset bushings installed:
Notes:
- Its also worth mentioning I did the ECS Stainless Steel brake lines at the same time, you can see that guide here: https://bmw.spoolstreet.com/threads/ecs-stainless-steel-brake-line-upgrade.2938/
- The larger size of the calipers means you should make sure your wheels will fit. Generally 19" wheels are required and due to the nature of the wider E60 rotors you need to make sure it will clear your spokes. If you think there may be contact issues, purchase a 5-10mm wheel spacer.
- The F30 brake pad sensors that come with the kit do not work, you'll need to re-use the sensors if they are still good or you can purchase these: https://www.amazon.com/gp/product/B013THROAY/
REAR BRAKES
If you want to test wheel rotation for dust shield scraping sounds, something that may end up being an issue; I recommend a lift due to the differential. Remove the left rear wheel and set it aside. I also recommend placing a card board box under the wheel you're working on, inevitably brake fluid will squirt out or drip in an unexpected place and this will keep it off your floors.
To minimize the brake fluid that leaks out, put a steering wheel lock or something heavy on the brake pedal. This will initially cause fluid to squirt out of course, but it does minimize the flow afterward:
Using a 14mm wrench, loosen the brake line that feeds the caliper, keep a rag and drip pan handy to catch the brake fluid. Then using an 11mm brake line wrench, loosen and remove the nut on the other end, be very careful you do not strip this soft aluminum nut. Once its released, pour out fluid into the pan and wipe off any spillage.
Use a screw driver to pop out the pad retainer:
(When you're doing the right rear wheel, you need to remove the brake sensor from the caliper, don't lose the clip, and disconnect it all the way back out of the way)
Looking down, you can see the two bolts on the back of the knuckle that hold the caliper on:
Loosen with a 16mm ratchet and the caliper should come off. If you put a brace on the brake pedal, I recommend grabbing a paper towel when doing this part so brake fluid doesn't shoot out onto your car when the pads get compressed. Once removed, grab one of the rubber plugs from your new calipers and stick them in the old calipers to prevent them from leaking on your shop floor.
Use an allen wrench to remove the key holding the rotor in place:
At this point you have to smack the rotor on the hat which is the inner circular area that sticks out. Not the very center where the nut is, but around the area where the lug nuts go in. Hit it a few times and the rotor should come off. If you can't get it to come out, you can buy or borrow a gear puller from Autozone. Be careful when using a gear puller, the rotor tends to fly off the hub. This was their 5 ton unit, it was barely large enough:
As you can see in the picture below, the dust shield obstructs the F30 caliper:
So grab some tin snips and cut away some of the dust shield and be VERY CAREFUL! This tin is incredibly sharp when you're cutting it and it would be way too easy to have your hand slip and slice one of the tendons in your fingers:
You may have to cut the dust shield toward the center which sits next to the ebrake. When you put it all back together you don't want to hear scraping sounds on the rotors like I did, the more you remove the better.
Edit: The below instructions in the spoiler are now obsolete
Next, you need to reduce the threads on the caliper from M12 to M10 with a timesert. The Timesert has a collar on one end that sticks out a little bit, and to prevent this collar from interfering with the mounting surface of the knuckle, I inserted the timesert from the rotor side with some red loctite:


As you screw the timersert in, it will begin to have resistance. This is because the bottom threads are cold rolled and designed to expand into the outter threads, locking them into place. So grab your stock caliper bolt, or preferably the official tap that comes with the Timesert kit, and begin to screw it in from the collared/rotor side just far enough so we can get the timersert seated and locked in:

Now do the same with the other hole and leave these bolts in for at least 10 minutes so the loctite can begin to set. You don't want to pull them out too soon in case the inserts try to back out:

As you screw the timersert in, it will begin to have resistance. This is because the bottom threads are cold rolled and designed to expand into the outter threads, locking them into place. So grab your stock caliper bolt, or preferably the official tap that comes with the Timesert kit, and begin to screw it in from the collared/rotor side just far enough so we can get the timersert seated and locked in:
Now do the same with the other hole and leave these bolts in for at least 10 minutes so the loctite can begin to set. You don't want to pull them out too soon in case the inserts try to back out:
Some of the photographs from this point will show a caliper that had the machine work done on it. I had some special washers made for my bushings that 'compensated' for this removed material to make it behave like I had not done the machining, so just ignore it and pretend the caliper is stock again.
Next, press out the M12 bushings from the caliper and press in the M10 eccentric bushings you got from the supplier from Poland.
Photos: https://bmw.spoolstreet.com/threads...e-brakes-on-e90-e92-e93-guide.2941/post-88371
Once you have this finished you can go ahead and mock the caliper up onto the knuckle and make sure the dust shield doesn't hit anywhere. This step is really important otherwise you'll be hearing your dustpan scrap as you drive around and you'll have to come back here and do it again. The dust shield doesn't come off without removing the knuckle so its probably easier just to bash the shield in so it won't come close to the ebrake stuff.
Next, install the E60 rotor and caliper:
Make sure the rotor is in the center of the caliper.
This is what happens when you try to use an aftermarket E60 rotor without an eccentric bushing. You can see how close the rotor is to the caliper:
Once fitment of the caliper has been confirmed, we'll need to put the brake pads into the calipers AFTER the caliper is mounted. Here is a demonstration of how the pins and clip work. With the caliper over the rotor:
First, slide in the brake pads with the compounds facing inward toward the rotors:
Then you place the clip down and slide one of the pins through the side of the caliper, into the brake pad and OVER the clip, through the other brake pad and into the caliper. I did not push the pin in all the way since its just a demonstration. You may need a small punch and a hammer to tap it through the other side. Push the other side of the clip down and do the same thing:
And this is what it will look like assembled, except the pins will be punched in all the way:
So go back to your caliper and put some brake paste on the back of the pads which will face the piston/caliper, away from the rotors as well as on the sides of the clip which press down onto the brake pads(not shown):
Now put these pads into the hole on the caliper, on either side of the rotor:
Now, install the clamp and pins as explained above. Once you have the first pin through both pads, grab a 1/4 drive socket that is smaller than the pin, place it on the end of the pin and use a hammer to tap the pin into place. A longer socket makes it easier to grasp:
Now do the same with the lower pin and the caliper is assembled:
Now install the brake line back onto the caliper end first with a 14mm, then do the other end with the 11mm brake line wrench.
Lastly, MAKE SURE YOUR WHEEL FITS! I scratched my caliper finish because the wider rotors put my calipers further out and it made contact with the spokes of my OEM 230 style wheels. I bought 5mm spacers to fix the problem, they barely clear as you can see in this photo:
When done with the rears, it will look like this:
Repeat on this entire process on other side.
FRONT BRAKES
Put the brace back on the brake pedal. Crack the front lug nuts, safely put the front end of the car on jack stands and remove the front left wheel.
Position a drip pan below the brake line and loosen the bottom portion feeding into the caliper enough so its loose. Then completely remove the top portion of the brake line, hold a paper towel around it to catch any fluid leaks. With this top end of the line removed, you can now twist and remove the caliper end, be ready to pour the fluid stored in the line into the drip pan.
Now remove the rubber grommets on the lines from the bracket and remove the brake line:
Remove the brake pad sensor if doing the front left wheel:
Put your hand on the brake pad retainer so it doesn't go flying, and pry it out with a flat head screwdriver:
Remove the two bolts on the back holding the caliper on and take off the caliper. Make sure to have a paper towel handy, as the caliper is shifted it likes to squirt fluid out of the newly exposed hole. Grab the rubber plug from your new caliper and stuff it in the old one to stop it from leaking everywhere.
Use an allen wrench and remove the allen key holding the rotor on. Smack the hat once again with a hammer to remove the rotor, or use a gear puller. Make sure you move everything out of the way, when the rotor breaks free it can be unpredictable:
Remove the dust shield:
Bolt the new dust shield on, only two of the original bolts will fit. Optionally, you may skip installing the dust shield as it has caused some tie rod rubbing issues for some people. On the bottom left hole, use a sharpie and mark the knuckle to get an idea of where the new hole needs drilled:
Take a measurement or just guess, hammer the marked location flat, drill the new hole and bolt back up to the knuckle:
Install the new rotor with the allen keeper:
Adjust the dust shield on top and bottom and bolt on the new calipers:
Apply the paste to the backs of the pads and the sides of the retaining clip that presses down onto the pads then insert into the calipers and secure just like the rears:
Install new brake pad sensor:
Connect the brake line and put the wheel back on, check clearances and repeat with the other side, and then bleed your brakes once again using the INPA method explained here: https://bmw.spoolstreet.com/threads/inpa-dsc-brake-bleed.3319/
You're done!
Last edited: