08 135i ST SpeedTech, Helix OD, Dual Bosch044, Diffsonline, PSP900

MoistNapkin

Corporal
May 25, 2019
104
89
0
Ride
08 135i
Alright folks, I’ve finally been cyber bullied into making a build thread.
30639


I come from the land of E30’s which are fun but the chassis has its limits, and the prices on parts are starting to skyrocket. I decided it was best to cut my losses, sell the e30 stash and allocate those funds to a build worth the time and effort. I made a promise to myself I’d do everything possible to make this build a “no expenses spared” project with a goal of 700hp+. The plan is to overbuild for power, not build up to my power goals.

The Vehicle:
08/03 135i w/ M Package
166,XXX miles
Stock suspension
Apex Arc… not sure what overrated style it is... 8’s?

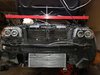
The rig sat for nearly two years before I pulled the trigger on this project. After replacing the water pump she started right up without a hiccup. The car had been parked with a full tank of gas which didn’t seem to oxidize, or go bad. I was a bit worried but ran the full tank through it without issue. I did this knowing that I’ll be replacing the entire fueling system. The paint is shot in a few areas, but the unibody is pretty much dent free. Interior is "Aged" Coral red.
30638

30653


Engine:
166,XXX Miles
Stock rotating assembly, and valve train
X2 Spare N54 longblocks (just in case)
Head ports plugged
New HPFP (To be installed)
Index 12 Injectors (to be Installed)
New Precision coils (to be installed)
New spark Plugs (To be installed)
New NGK 02 sensors
New OFHG Seals
New valve cover gasket
New oil pan gasket
New chain tensioner
New Belt
New water pump
New starter
New 335D reservoir
New CSF Radiator
New Map sensor 3.5
OX Werks crank seal protector
Homemade crank capture bolt tabs
30640

30654

Transmission:
Stock 6hp21 + Spare
I acquired a spare transmission recently and will take a whack at building it myself. Worst thing that can go wrong is the thing blows up, and I waste some time and money. Boohoo.

Differential:
Choosing a differential was disappointing at first because I had no interest in using a Torsen style differential, or any gear/vicious driven for that matter. So after a few days looking at a clean credit card I pulled the trigger on a clutch based differential. Diffsonline, although spendy have some killer options for those looking for a PROPER LSD. These guys build differentials for a multitude of GT teams, along with countless high abuse builds.
Specs:
3.46 ratio
3-Plate LSD
35/60 Custom Ramps
Polished ring, and pinion
30641

30642


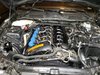
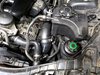
Turbo Kit/Installation:
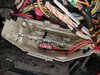
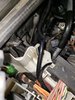
I went with a SpeedTech bottom mount kit spinning the ever so popular 6266 gen2 BB. I ordered the kit with a black ceramic coating, and some PCV hoses to button up that portion of the build. The ordering process is straight forward, and Jeff treats you like one of his own when it comes to any kit related questions. I went with this specific bottom mount kit because it's one of few that utilize separate runners until reaching the T4 flange, rather than being a "Log style" manifold like most companies.

I just finished the installation of this kit a few days ago and it went incredibly smooth! I did the job on jack stands, and as long as you drop the subframe to its lowest point and raise the engine to its highest point with the support bar, you have ample clearance for turbo/manifold installation. The biggest inconvenience I had was the accessibility to some of the manifold bolts. I had to use a combination of 1/4 drive, and small open-end wrenches to fully tighten the few. I also had to cut down the water pump intake hose quite a bit as mentioned in the manual. The kit is very well organized in sealed bags and labeled.
30643

30644

30645

30646


Fueling:
They say Thai Ming is an ancient art, and that’s exactly what happened with my fueling plans. I had purchased everything for port injection ie; AIC Controller, 900cc injectors, Sharp Customs intake. About three weeks later we all caught wind of some weird overdrive pump, and I didn’t think much of it. Now I sit here a victim of my own curiosity holding a Spool Performance overdrive pump. So now I get to sell the other stuff! I’ll be using the Sharp customs intake and perhaps use the ports for a different kind of supplemental fueling later.

Fueling Setup:
Custom Dual Bosch044 LPFP pinned with OEM connectors.
BPM4 Controller
Motiv Flex Fuel controller
GM Flex Fuel sensor
New HPFP
Spool Performance Overdrive pump
Parker 3/8 e85 friendly fuel line
E85Freaks 5-micron fuel filter
Holley Hydramat (I recommend this to all Bucketless user's.)
30647

30651

30652


Boost Control/Induction:
GFB G-force 3 EBC
4 port mac setup
PSP 900 Intercooler
VRSF 335D chargepipe
Sharp Customs Intake
Phenolic spacer
30648

30649
30650
 
Last edited:

MoistNapkin

Corporal
May 25, 2019
104
89
0
Ride
08 135i
This post will be just miscellaneous install tips, and general info. This isn't an update as much it is getting you folks caught up on everything.

Got some last minute packages and the Grey gets the cardboard. creepy ass thing..
30889


Blocking Head ports: Important Tip: When inserting the allen heads into the ports, place a magnet "downhill" from the port just in case you drop one... Chances are that magnet will save the allen head from getting lost in the head! This process is easier than you'd think even if you happen to be a beginner.
I've had some experience in tapping aluminum, so this was comfort zone material for me.
As you can see I used a Q-Tip to get a better gauge on the head port angles, this made tapping much easier as you could imagine. I used the paper towel and goop method to catch particles, it was what I had on hand and works just fine. If you use moderate pressure for the first 2 turns you can let go and kinda reposition yourself for better form, then slowly twist in, once you feel resistance back out a couple turns and commence tapping deeper. I personally clean the tap by running it through one more time just to grab whatever is left then air it out.
30896

30897

" Do maintenance and you wont need a seal protector." Well it's great peace of mind knowing if something oddball happens that I wont be biting nails as I run for the hood latch.
30890


Here are some ho-made crank capture bolt tabs to prevent the crank bolt from backing out. I borrowed my drug dealers scale and weight balanced them for the hell of it... After returning the scale back to my closet I then painted them and installed the units. They bind quite well with a little bit of play, but the bolt holds no pressure. If it was an older BMW I would have simply used metal wire as they use a nut.
30893
30894

30895


Okay lets install a PSP900 intercooler! There seems to be a decent discussion on the correct tooling to cut the plastic shroud that's mandatory on larger intercooler's. The best tool without a doubt is a dremel with a cutting style bit! It cuts through like absolute butter and gets into the hard to reach spots easily. It took me maybe 15 minutes total to cut the area correctly.
You can see in the photo's that I cut a little bit higher than needed. I'm okay with this mistake because it may turn into a decent area to install a different kind of cooler.

It was much easier than I expected! The inlet fits right onto the speedtech kit with ease. I used a harbor freight low profile jack which DOES NOT reach the mount holes by 1 inch; However, this is excellent because the intercooler is too close to the mounting position and bash bar to fall.. now is the time to plumb in the hot side of the intercooler. after that's slipped on you can commence threading in the unit. I used larger screws and quite literally cross threaded the bastards in there, I did this because I didn't trust the stock screw to hold in an intercooler that's triple the size of the stock unit.
30954

30952


Cut the fan shroud flush, and then cut each corner out for the pipe routing. cut the right side a lot.
30953

30955


Again, cut this portion flush you will see when you get there that both sides are "barbed' and blocks the install process.
30956


In order to fit the 335D charge pipe, then outlet tube supplied by PSP will need cut even more than pictured here.
31765


This image reveals where the outlet pipe looks like installed relative to the charge pipe, and the initial cut. I had to cut well into the curve of the mandrel bend. Second is the coolant elbow which will be addressed elsewhere on this page.
31766


Here's another reference with it fully installed. You can see the charge pipe lip is pushed all the way to the kink on the silicone elbow. The outlet is the majority of the way in there. NOTE: Be conscious of coolant hose that comes down vertically off the upper radiator hose, The lower charge pipe clamp threads point at the picture below. If you push on that specific line too much you'll end up with a leak from that fitting.
Which is why I needed to take a step backwards and purchase a new hose.
31767

31768

31769


Wire routing, Always fun to say those two words! lol.. I personally don't mind it but still..
I tucked the wiring for the G-force Boost controller, and also rerouted the coolant level sensor for the 335d coolant reservoir capacity sensor. The G-force ebc wiring I routed through the glove compartment and into the DME box.

after routing the ebc wiring through the glove box, i then routed the line around to the 3 grommets on the right side of the box. I then grooved one of the rubber grommets to fit the vac hose and wiring. (better ways to do this)
30958


You can see the wiring and where I spaced an area with a piece of rubber to prevent possible pinch although it wasn't close to pinching at all.
30959


Here's the grommet I grooved out for the vac line, and mac noid wiring.
30960


Look carefully and you can see where I've ran the mac noid wiring into a little rubber flap, this is the same area I run the coolant reservoir wiring!
30962


See that rubber "L" next to the hood shock? That pops off and you can run the wiring directly with the other wiring in that location. I also ran my coolant reservoir wiring through here.
30963


If you look carefully you can see the ebc wire fully ran and plugged into the mac noid with very little visual scabs. I also have the sensor wire in there too its just hard to see.
31763


My bosch044 pumps are fakes!
I bought these pumps alarmingly cheap, and I kinda knew what I was doing but figured we would give it a whack.
Well today I was able to compare a REAL 044's vs my FAKE 044's. I've documented the difference for us to see.
The real 044 pump is always on the right hand side in these pictures.

You can see the visual differences instantly.
The real 044 has a shinier body.
The real 044 has posts that do not have a polished finish
The real 044 posts are different heights
The real 044 inlet fitting isn't zink plated
30965


You can see the font and wording are correct here, but the stamp on the real unit is thicker, and deeper.
30966


Once again, not hard to see the difference here. The real Bosch 044 has a finer mesh screen, and it's also more bright white in color. Note how shiny the body is here on the real unit.
30967


The real unit has a matte finish top, and you can see a seam, while the fake one is shiny and you can't really see a seam.
30968


Last but not least... The outlet... The real 044 on the right, fake on the left.
30969


335D Reservoir relocations are fun to figure out in a clean manner, I kind of got lucky here. Mounting positions are mirrored on the driver side.
The stock fitting doesn't work as it points directly in to the frame rail with no room for the hose. I found a less than mediocre T fitting that came off an extra hose leading to the thermostat. This piece didn't work because it interfered with the charge pipe and, outlet tube. Also needed a cap.
31772


What the interference looks like..no Buenos, bad angle too.
31770


I then found this fitting that on the extra heat core line I had to replace during the PSP900 install. This fitting worked perfect for my application. The fitting points downward, and on the other side of the frame rail where my coolant line is located.
31773


MSD80 MOSFET's are a well know issue and easily resolved. I used the cheap mosfets off amazon, digikey has better ones however. Any TV shop, or PC place that does micro soldering can do this for very cheap. The solders don't look great, but they're tested. You can see in the second photo that water has once existed on the DME pins.
31777

31778


Changed out the stock transmission mounts with revshift poly units. The install is very straight forward.. Slight jack up the transmission, undo old ones, install new ones. torque bushings to 21 lb/ft, and the mount to 26 lb/ft
31779
 

Attachments

  • 20190914_213223.jpg
    20190914_213223.jpg
    338.3 KB · Views: 27
  • 20190916_194808.jpg
    20190916_194808.jpg
    417.2 KB · Views: 25
  • 20190916_194924.jpg
    20190916_194924.jpg
    279.8 KB · Views: 24
  • 20191001_220656.jpg
    20191001_220656.jpg
    142.2 KB · Views: 19
  • 20191005_224136.jpg
    20191005_224136.jpg
    495.7 KB · Views: 509
  • 20191005_224108.jpg
    20191005_224108.jpg
    444.8 KB · Views: 512
Last edited:

MoistNapkin

Corporal
May 25, 2019
104
89
0
Ride
08 135i
This post will be for mainly Speedtech related installation tips, and photos.
30909

the unit with the turbo is pretty damn heavy, lifting it up into the the engine without damaging the new manifold seals is a concern, but don't over think it.
30910

You can set the turbo assembly on the subframe directly below the exhaust ports. Then if you lay down directly under the subframe and with a hand on each side "bench press" the unit up to the ports. The assembly balances out nicely when lifting. Once you get the the assembly on the studs you can somewhat hang the unit on the studs and get a bolt or two on.
30911


30912

There were a handful of people that criticized the return fittings for looking cheap. Well as far as I know it's the only company that offers a fitting that you can adjust. The oil line is a bit short if you don't clock the turbo %110 right. My clocking was very slightly off, but the that's okay... no slack or dip in the return line.

30913


30914

Look carefully and you see that one of the copper nut's cannot be installed with the turbo fully seated, the stud sticks out to much and the casting gets in the way.
I mitigated by spacing the assembly with an extension, doing that in combination with wedging the turbo on the studs will allow you to start the nut and seat the turbo without worry of having an uneven seal, or bad seal.

30915

I swapped out the chain tensioner, which you wont have to do..

A big concern on the Speedtech manifold is the placement of the 02 sensors, not ideal given people are already burning them up in other kits. Whether be from heat, exhaust pulse impact, or a combination of both its best to try mitigating just in case. I made a heat shield out of existing material that came off the engine. It protects the 02 sensor from the exhaust housing quite well.
I'll most likely use some 02 heat sinks/bunholio's to increase the lifespan on the sensors.
30947

30948

30949


I also added an excessive amount of heat wrap around the downpipe and silicone coolant return line.
Ignore the plastic zip tie, that was there for temporary holding.
30950
20190830_234251.jpg
20190831_011520.jpg
20190831_134853.jpg
20190831_134547.jpg
20190830_223330.jpg
20190830_223305.jpg
IMG_20190821_235324.jpg
20190916_205859.jpg
20190916_210901.jpg
20190916_210956.jpg
20190916_211245.jpg
 
Last edited:

works

Private
Mar 1, 2018
42
15
0
Ride
135i
Ace! Looking forward on how you handle the cooling side. Is the 335d reservoir larger than the original? Any shrouding plans for the FMIC and radiator? What about additional oil coolers?
 

MoistNapkin

Corporal
May 25, 2019
104
89
0
Ride
08 135i
Ace! Looking forward on how you handle the cooling side. Is the 335d reservoir larger than the original? Any shrouding plans for the FMIC and radiator? What about additional oil coolers?

I'm putting those on the back burner until I do shakedown runs with all the main upgrades. It's also coming up on cold autumn here in the NW, and I don't have any major plans for track days, or high heat abuse in the near future. Unless I see major coolant temp variations I most likely wont fix what's not broken. The easiest fix would be a dual 12'' or something of that nature. I'd rather avoid full on shrouds since they can also trap heat in certain situation. I'll do some snooping around for an oil cooler location, I wouldn't mind finding an oddball location that moves it out of the front.

I believe the reservoirs are the same size.


Get the manifold from Terry or Amazon?
From the jungle in a bulk order.
 
Last edited:

Asbjorn

Lieutenant
Mar 10, 2018
854
602
0
European, based in China
Ride
Z4 N54 DCT
Ace! Looking forward on how you handle the cooling side. Is the 335d reservoir larger than the original? Any shrouding plans for the FMIC and radiator? What about additional oil coolers?

Given the tiny CSF radiator, and huge FMIC, this build will be limited in terms of water temps, not oil temps. If anything, an additional aux radiator would be great, but I don't think this is a track build, so really not worth the risks imho.

Congratz on the project OP! What is the vision of your build?
 

MoistNapkin

Corporal
May 25, 2019
104
89
0
Ride
08 135i
Given the tiny CSF radiator, and huge FMIC, this build will be limited in terms of water temps, not oil temps. If anything, an additional aux radiator would be great, but I don't think this is a track build, so really not worth the risks imho.

Congratz on the project OP! What is the vision of your build?

You said it, the csf radiator is temporary but better than an oem unit with plastic end tanks:sweatsmile:
Still not sure one what route I'm going for a trans cooler so I picked up that unit for the convenience.
What I'll probably do next summer is cut the end tanks off the csf unit and scab them onto a griffin core, or something that's nice.

For now this is just going to be a low key high power street build with a few track days in given the proper upgrades. I'm an avid circuit racing fan and really get down on the technical aspects.
Eventually I could see this going into a full on gut and track time of thing, but that's most likely a couple years down the road. This is the wrong platform for drag times imo.

Updates coming later tonight maybe... also may add to the "reserved" areas.
 
  • Like
Reactions: Asbjorn

fmorelli

Lieutenant General
Staff member
Aug 11, 2017
3,748
3,592
0
57
Virginia
Ride
E89 Z4 35i, F10 535d
Another E30 guy ... nice.

I love the first photo. It runs in the face of the dolts that run around and say, "oh these are $6k cars now, nobody is going to spend money on them." Fools ...

Keep it coming ... love to see the build, and welcome to Spoolstreet!

Filippo
 
  • Agree
Reactions: Jeffman

Seaneezy

Corporal
Mar 12, 2018
133
34
0
Ride
e90 LCI 335i
If you're going to build out the ZF6HP21, talk to Jason at PropulsiveDynamics, he makes G3 carbon clutches that hold a lot higher torque than stock, however you will NEED to affix an aftermarket trans-cooler. There are also some aussie's who make billet input shafts as some get snapped, in my ZF6HP21 failure experience, it was the input shaft bearing that spun and wouldn't let me get into 4th gear, also my G3 clutches were burnt to a crisp. I'm collecting parts for a manual swap so I don't have to deal with this POS anymore.
 

Panzerfaust

Lieutenant
Jul 3, 2018
637
438
0
Chicago
Ride
E92 335i
Looks like a solid build! Glad to see new people coming to the N54 platform who are prepared to do things right and spend money where its needed.

I look forward to your results!
 

MoistNapkin

Corporal
May 25, 2019
104
89
0
Ride
08 135i
Update on post #2

Another E30 guy ... nice.

I love the first photo. It runs in the face of the dolts that run around and say, "oh these are $6k cars now, nobody is going to spend money on them." Fools ...

Keep it coming ... love to see the build, and welcome to Spoolstreet!

Filippo
Ha! Oh well, they're missing out! I dont think people quite understand the feel you get when stomping 30k-60k rigs.

If you're going to build out the ZF6HP21, talk to Jason at PropulsiveDynamics, he makes G3 carbon clutches that hold a lot higher torque than stock, however you will NEED to affix an aftermarket trans-cooler. There are also some aussie's who make billet input shafts as some get snapped, in my ZF6HP21 failure experience, it was the input shaft bearing that spun and wouldn't let me get into 4th gear, also my G3 clutches were burnt to a crisp. I'm collecting parts for a manual swap so I don't have to deal with this POS anymore.

Yeah I've been paying attention to the aussie's quite a bit. I plan to follow what most are doing. Since im not very much into racing from a dig I should be all good on the input shaft. I'll be sure to document it here.

Oh hey cool another local speedtech kit! :)

Whalecum brothar

We'll have to get together here soon. Not very many locals running a ST kit of any kid.

Looks like a solid build! Glad to see new people coming to the N54 platform who are prepared to do things right and spend money where its needed.

I look forward to your results!

I appreciate man! I've lurked for the past couple years, so that helped. I hope to see some good results.. I have 2 spare engines in case shit hits the fan.
 

JimboFresh206

Sergeant
Jan 29, 2018
289
152
0
Ride
335/635/535/533/633
@MoistNapkin yeah your the only other person with a speedtech kit I've heard about around here. I'm in Tacoma, and work at Kassel Motorsports if you ever need parts or just wanna come by the shop and shoot the shit

Really interested in the 044s since I have duals on another car aswell. Are you worried about how they will hold up to ethanol? I've heard it's a mixed bag with them.
 
  • Like
Reactions: MoistNapkin

MoistNapkin

Corporal
May 25, 2019
104
89
0
Ride
08 135i
="JimboFresh206, post: 81317, member: 1897"
@MoistNapkin yeah your the only other person with a speedtech kit I've heard about around here. I'm in Tacoma, and work at Kassel Motorsports if you ever need parts or just wanna come by the shop and shoot the shit

Really interested in the 044s since I have duals on another car as well. Are you worried about how they will hold up to ethanol? I've heard it's a mixed bag with them.

oh very cool! I've bought some of your interior cloth you sell! We both had/have M30 swaps which is pretty dang cool... great engines.

Can't say I have much concern for the units since they've been around forever in the supra, corvette, and dodge world. They didn't seem to have many issues as far as I saw, and the one I helped install is going on 8 years or something now. I did however see a decent handful of posts regarding premature failure.. Not sure if they were e85 related, but I hear too many people using e85 in them to trigger a concern. They make the bosch040 that which is kind of a "sump pump" not in pump design, but how it pulls off the bottom via screen. Jay racing either does, or used to make a modified 044 that used ceramic internals and pushes some killer number at less amperage.

I'll definitely drop by one of these day, I get a lot of work up north.
 
  • Like
Reactions: JimboFresh206