Chassis, Brakes, etc
Honestly I think this is where all the fussing around is going to be. There are some things that need to be modified to swap over so I'll document that as I go:
- Heat Shields and undertrays
- Brake Lines and Fuel Lines
- Fuel Pump
- Airbox
First Project is to see if I can salvage my trusty 17" wheels. I've been running 17x9 et42 ARC8s on the 135 and I really dig it. I have a lot of track friends that run E36s so there's an abundance of similarly sized wheels amongst us. Also, the tire cost is quite a bit lower, the ride is better over curbs, etc. I have been running 335i brakes on my 135 for several years and have no doubt they would be up to the task on the M1.5 so that's my goal. Keep the brakes, keep the wheels. The front is no issue, the 135 hubs with 335 brakes will bolt right on with the 135 tie rods. This is basically exactly what I already have since I had an M3 rack and control arms in the 135 already.
Issue is then the rear, the balance would definitely be off with 335 front brakes and M3 rear brakes. I tried every combo I could think of to get the 335 brakes bolted onto the M3 rear hub with no luck. There is also a toe arm difference between the 135 knuckle and M3 knuckle/subframe so it looks like I'm stuck with the M3 rear brakes, which means M3 front brakes, and 18" wheels. I could go to a 355mm Stoptech set up that would allegedly fit in the 17's but I just don't have it in the budget. Oh well, hopefully that's the biggest disappointment of the project so far...
What do you suppose the odds are the M3 carbon crash structure will work with the E82? They're close enough I'm 100% going to try it. They look like they're different sizes in this picture but they really aren't. The M3 may be just sliiiiightly "longer" but the 1 series bumper should accomidate that. EDIT: It does fit. You need to trim quite a bit off the ends but it will fit. The tow hook bung also sticks out of the bumper and the cover won't go back on so it's probably got a great mod for everyone but it works for my track car.
Edit Edit: As I put the car back together I gave up and put the steel one back in. The fiberglass M3 bar interferes with several things in the front and I didn't feel like chopping up everything.
First minor snag I ran into is there are two studs for attaching the rear front fender liners that interfere with the V8 subframe:
I just zipped these off and applied some rattle can bed liner. Not yet sure how the fender liners are going to fit. The M3 has two pieces (actually three total) so the subframe can be exposed without removing the whole wheel liner. Maybe I can hack those to work.
Did a dry fit of the suspension with the M3 front knuckles and tried some wheel fitments.
17x9 et42 that was on the 135:
Looks like the M3 hub/knuckle pushes the wheel out about 5mm farther than the 135 hub/knuckle.
E36 17x8.5 DS2s with 6mm spacers to make them et35 (my ideal)
This is with a 245/40R17, and seems to juuuuuuuust fit. I can still roll the fenders and have a bit more camber to add anyway so I'm going to go with 18x8.5 et35 Apex SM-10s and 245/40R18 Falken RT660s. It's probably way safer to run an et40-45 but they don't make the SM-10 in those, just the ARC-8 and I want something different.
Onto a couple of the tasks I was really dreading, adding/removing some studs around the car, and shortening the fuel line, fuel vapor line, and brake lines.
Modification of the studs in the engine bay is pretty straight forward, you need to remove 5, and add 5 (3 and 3 if you're doing a manual swap)
Remove:
- Two studs on the passenger side frame rail of the car that interfere with the DCT cooler lines
- Two studs near the engine ground that were used for a bracket that held the 135 fuel/brake lines
- One stud on the driver's side frame rail that interferes with the HVAC coolant line
Add:
- Two studs on the passengers side for DCT cooler line mounting points
- Two studs on the driver's side for the HVAC coolant line
- One stud on the driver's side cowl area for a fuel line mounting bracket
I used epoxy on studs from McMaster:
https://www.mcmaster.com/97590A881/ and
https://www.mcmaster.com/97590A817/
I did some research on what epoxy to use since these will see some heat, and landed back at the tried and true OG JB Weld. None of them will have much/any load on them so I doubt it matters too much, just use a good quality epoxy.
Onto the fuel and brake lines. This is pretty simple, just cut them and join them back together. I installed them in the car, picked a straight portion of each to do the cut, cut them, installed front and rear sections where they want to be, then cut to length and joined them. The fuel vent line you'll need to use the rear section from the 135 and the front section from the M3 since the charcoal canister in the rear is on opposite sides. Just put both lines in and it's obvious where you'll cut and connect them.
For the vent line I just used a cheapo 3/8" (10mm) ID brass barb connector. You'll have to warm up the plastic line to get it pushed in but it wasn't too bad. This sees no pressure so I'm not worried about hose clamps or anything... this definitely is not coming apart. Amazon:
https://www.amazon.com/gp/product/B0753C842P/ref=ppx_yo_dt_b_asin_title_o01_s00?ie=UTF8&psc=1
For the fuel line I used a SS compression fitting for 8mm OD pipe:
https://www.mcmaster.com/5305K315/
And the brake lines I just cut, flared and used a coupler. I'm not completely happy with this since there's also a coupler right in the passenger wheel well of the M3 lines. Since my rear subframe is going to be rigidly mounted I may redo this and skip over the chasses to subframe soft lines and run new lines from the wheel well right to the rear soft line connections.
The stock M3 lines will need to be rebent slightly to conform to the 1 series chassis:
DO NOT MIX UP THE LEFT TO RIGHT CONNECTION.
How much needed to be removed:
Subframe: I'm going fully spherical and solid subframe mounts. So fun. This is straight forward, and not necessary. The M3 subframe will bolt onto the 1 series chassis exactly as is.
Driveshaft: This is a big one. You need to remove 3 7/8" *FOR A DCT CAR* I looked high and low within a two hour drive of me but no one would touch it. I got a tip from someone that has already done this that a company called
Driveshaft Pro in CA can build a brand new one to spec. Called them up and $650 later had a new driveshaft. I got the 3 7/8" taken out of the rear section but this was a mistake, the u-joint hits the heatshield if you do this. The chassis has two sets of holes for the center bearing that are... 3 7/8" apart so you definitely want to take the 3 7/8" out of the front section so the center bearing and u-joint are in the stock location so the heatshields clear. I just beat the heatshield with a hammer a bit and it's fine now.
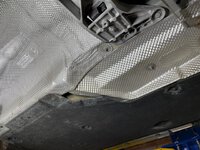
Getting the heat and splash shields and all that in wasn't too bad. There are slight differences but it's pretty easy to mix and match and get them secured. I used all the 135 shields, except the driver's side exhaust area. The M3 trans cover and 135 rear sections mate up to everything perfectly.
As for the fender liners, I cut the bottom wings off the 135 liners, and trimmed up the M3 part that goes over the subframe, added a couple mount points and it's fine. Not perfect but once the wheel is on you'll never notice.
You'll need to use the 135 under body panels, and do some trimming to fit. The M3 under panels are too narrow since the side skirts on the M3 extend farther under the car.
Have trim the front a bit to meet up with the M3 wheel liner tail pieces"
There's the little gap in the shield where the M3 heat shields don't extend around as far but oh well.
In the front I cut the 135 under tray and then screwed it to the M3 subframe brace. Eventually I want to make a flat bar that goes across the panel and applies more even pressure across it, but this works for now:
Cleaned up the knuckles, and started to bolt everything back together... this is the easy part now.
NOTE: if you have coil overs on your 135 that you want to reuse you need to buy sleeves. The M3 strut is larger so the M3 knuckle won't grab a 135/335 strut. I obviously wanted to keep my JRZ RS2s so I got these:
https://www.bimmerworld.com/MCS-E9X-M3-1M-Strut-Adaptor-Sleeve.html
Also of note, the middle hood cross member definitely needs to be trimmed to clear the very front of the air box. I just used a die grinder and zipped it out a bit.
And that's a wrap:


 the car is 95% track use, so the main issue is the cost of consumables, I go through at least one set of track tires a season. I was running E9x 335 brakes with Bimmerworld bushings, Stoptech rotors, and PFC08 pads and never had an issue with the brakes even when pushing as hard as the car could. I don't anticipate any issues with the M3 set up.