

Another Atacama Yellow E89 Build Thread (UK)
- Thread starter pbondar
- Start date
You are using an out of date browser. It may not display this or other websites correctly.
You should upgrade or use an alternative browser.
You should upgrade or use an alternative browser.

This is my personal struggle with my DCT box…
All was well until I decided to change the fluid and at the same time use a trendy alloy pan to look cool and carry a bit more capacity..
After my local low tech garage had fitted it, there was some very light oil seepage from the pan..maybe a drop or two of fluid if that per night.
I tried two or three times to subsequently get a garage to see to the leak without anybody taking me up on it..I wonder why..
I then got a ‘BMW service centre’ to change the o ring and refill it..after much drama with torque settings and having to get a fresh o ring airlifted in from the states.
However I noticed when driving along the odd puff of a burnt oil smell occasionally..when I got home the next day I could see a good patch of fluid on the ground.
I thought with 7 litres of fluid no big deal..
A couple of weeks later when trying to fo a full power 3rd gear test run for a new ECU tune it firstly prematurely shifted into 4th..on another run I then got ‘the bong’ with car going into limp mode.
Switching off and repeating the attempted run resulted in same situation.
My Protool code reader said..
5A44 clutch 1 incorrect pressure
5A41 Pressure sensor, clutch 1, total failure.
I pooed myself
Slowly drive home, rechecked the box..no errors.
Booked an appointment with same said garage..they then cancelled my appointment saying they were busy and they’d get back to me the next morning.
I went through the ‘if you need to get it done sometimes you just have to do it yourself.’
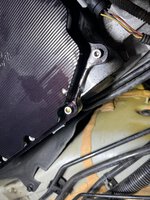
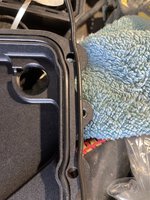
It looked like after cleaning everything thoroughly around the gearbox that the leak (when stationary ..no engine running ) iwas just from my after market alloy oil pan seal..
Side seal seems dry..couldn’t see the top seals / wire seal but was hoping it was just the bottom seal
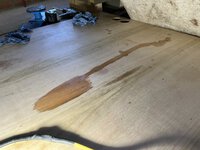
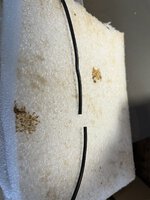
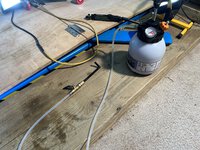
Here’s are some photos plus the amount dripped out in 15 hours onto my wooden platform I usedfor crawling under the car..
I’ve bought a pressure filler and decided to fit my back up Polish alloy pan to see if the leaks stop..
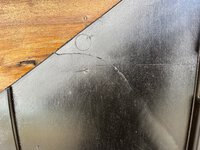
Fair amount of damage to under tray plastics so got some alloy and pop rivets to repair some of the cracks ..
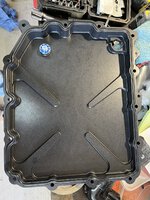
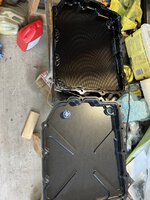
I dropped the ‘seems leggit’ alloy pan…
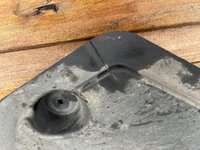
The sealing o ring had popped out from its groove so it wasn’t possible to see if it was seated properly..
However the fitter had used some grease to try and retain it prior to fitting..
When I inspected the o ring it came apart indicating that maybe it had been pinched..
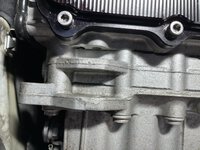
More worrying was damage to the mating face in the same area..was he poking the o ring back in ?
You can see compared to the new Polish version that the Polish version has a thicker more positively located o ring..
3 litres of fluid came out…I think it should be at least 5 litres ..
Frustratingly the Polish pan uses the OE pan drain plug which was thrown away when the US pan was fitted..
My £16 new plastic drain plug arrived so I could start the reassembly can begin..
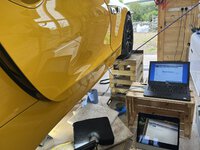
After loading 4.5 litres up then I had to use Bimmergeeks Protool as my ISTA for reasons I’ve yet to work out wouldn’t talk to the DCT as well as a couple of other ECUs..
Followed the same procedure with a couple of commanded shifts into 1st and 2nd for good measure..another 2 litres went in…
So 3.5 litres came out and 6.5 litres of Fuchs finest went in..
The dribbling out of fluid on the two fills felt like I was swimming in a sea of fluid.
I’ll take the car out for a 100 mile run on Sunday and see what gives.
All was well until I decided to change the fluid and at the same time use a trendy alloy pan to look cool and carry a bit more capacity..
After my local low tech garage had fitted it, there was some very light oil seepage from the pan..maybe a drop or two of fluid if that per night.
I tried two or three times to subsequently get a garage to see to the leak without anybody taking me up on it..I wonder why..
I then got a ‘BMW service centre’ to change the o ring and refill it..after much drama with torque settings and having to get a fresh o ring airlifted in from the states.
However I noticed when driving along the odd puff of a burnt oil smell occasionally..when I got home the next day I could see a good patch of fluid on the ground.
I thought with 7 litres of fluid no big deal..
A couple of weeks later when trying to fo a full power 3rd gear test run for a new ECU tune it firstly prematurely shifted into 4th..on another run I then got ‘the bong’ with car going into limp mode.
Switching off and repeating the attempted run resulted in same situation.
My Protool code reader said..
5A44 clutch 1 incorrect pressure
5A41 Pressure sensor, clutch 1, total failure.
I pooed myself
Slowly drive home, rechecked the box..no errors.
Booked an appointment with same said garage..they then cancelled my appointment saying they were busy and they’d get back to me the next morning.
I went through the ‘if you need to get it done sometimes you just have to do it yourself.’
It looked like after cleaning everything thoroughly around the gearbox that the leak (when stationary ..no engine running ) iwas just from my after market alloy oil pan seal..
Side seal seems dry..couldn’t see the top seals / wire seal but was hoping it was just the bottom seal
Here’s are some photos plus the amount dripped out in 15 hours onto my wooden platform I usedfor crawling under the car..
I’ve bought a pressure filler and decided to fit my back up Polish alloy pan to see if the leaks stop..
Fair amount of damage to under tray plastics so got some alloy and pop rivets to repair some of the cracks ..
I dropped the ‘seems leggit’ alloy pan…
The sealing o ring had popped out from its groove so it wasn’t possible to see if it was seated properly..
However the fitter had used some grease to try and retain it prior to fitting..
When I inspected the o ring it came apart indicating that maybe it had been pinched..
More worrying was damage to the mating face in the same area..was he poking the o ring back in ?
You can see compared to the new Polish version that the Polish version has a thicker more positively located o ring..
3 litres of fluid came out…I think it should be at least 5 litres ..
Frustratingly the Polish pan uses the OE pan drain plug which was thrown away when the US pan was fitted..
My £16 new plastic drain plug arrived so I could start the reassembly can begin..
After loading 4.5 litres up then I had to use Bimmergeeks Protool as my ISTA for reasons I’ve yet to work out wouldn’t talk to the DCT as well as a couple of other ECUs..
Followed the same procedure with a couple of commanded shifts into 1st and 2nd for good measure..another 2 litres went in…
So 3.5 litres came out and 6.5 litres of Fuchs finest went in..
The dribbling out of fluid on the two fills felt like I was swimming in a sea of fluid.
I’ll take the car out for a 100 mile run on Sunday and see what gives.
Attachments
-
 IMG_8131.jpeg327.3 KB · Views: 58
 -
 IMG_8132.jpeg410.9 KB · Views: 45
 -
 IMG_8135.jpeg439.6 KB · Views: 47
 -
 IMG_8137.jpeg539.6 KB · Views: 45
 -
 IMG_8138.jpeg649.8 KB · Views: 53
 -
 IMG_8141.jpeg438.8 KB · Views: 29
 -
 IMG_8142.jpeg623.8 KB · Views: 46
 -
 IMG_8143.jpeg289.8 KB · Views: 27
 -
 IMG_8144.jpeg447.2 KB · Views: 30
 -
 IMG_8147.jpeg550.1 KB · Views: 27
 -
 IMG_8148.jpeg308.9 KB · Views: 33

Yup overtime I’m increasingly drawn to just quality OE spec parts..What a pain, sometimes going back OEM is the "right" thing (see oil filter housing caps vs aftermarket billet units)
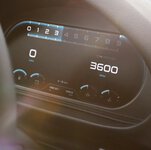
Decided to go with the ID4Motion digital instrument display cluster..
I’ve looked at both this version and the one from China that mimics the G29 style display.
In the past neither floated my boat.
Both seemed fixed format and limited options.
The lack of s/w support on the Chinese one..evidenced by lack of E89 image in start up display and fuel figures not available in UK gallons per mile plus for me the garish (IMHO) graphics rendered it a no go.
The ID4 version mimicked the old analogue dials but seemed a lot of money for a digital rendition of the original display.
Time moves on ..the company subsequently released several different themes..each of which could be had in a broad palette of colours.
So with Black Friday coming up and in collaboration with another AY 35is owner we negotiated a deal to buy two units and a few bits.
Each theme and colour combo is charged for..so I picked an initial 8 themes / colour combos..plus the support for reversing camera and the blind spot h/w and s/w..
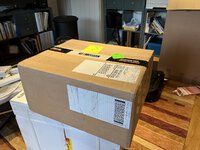
Box arrived yesterday..
Plan to fit it over the next two or three weeks along with the rest of the audio upgrade ..DSP amp and Subs along with front and rear cameras plugged into this and the MMI MOST box..
I’ve looked at both this version and the one from China that mimics the G29 style display.
In the past neither floated my boat.
Both seemed fixed format and limited options.
The lack of s/w support on the Chinese one..evidenced by lack of E89 image in start up display and fuel figures not available in UK gallons per mile plus for me the garish (IMHO) graphics rendered it a no go.
The ID4 version mimicked the old analogue dials but seemed a lot of money for a digital rendition of the original display.
Time moves on ..the company subsequently released several different themes..each of which could be had in a broad palette of colours.
So with Black Friday coming up and in collaboration with another AY 35is owner we negotiated a deal to buy two units and a few bits.
Each theme and colour combo is charged for..so I picked an initial 8 themes / colour combos..plus the support for reversing camera and the blind spot h/w and s/w..
Box arrived yesterday..
Plan to fit it over the next two or three weeks along with the rest of the audio upgrade ..DSP amp and Subs along with front and rear cameras plugged into this and the MMI MOST box..
Attachments
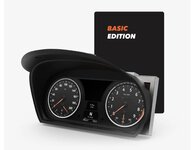
Here are the ‘themes’ I’ve bought initially..you can add any you want..but they charge you around 20 euros for every single colour added..
Attachments

So started my winter upgrade / refurb / update program..
new uprated EKP, digital dash, new DSP/amp plus lots of minor other bits..joy of having a nice man cave on a damp Scottish winter’s day..
new uprated EKP, digital dash, new DSP/amp plus lots of minor other bits..joy of having a nice man cave on a damp Scottish winter’s day..
Attachments
Great advantage as many of you know with a winter project started early is the joy of stopping and sorting things out and moving on.
For those whose idea of a good audio system is a reasonable volume stereo amp and 2 or 4 speakers then ignore the rest of this post..
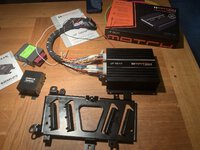
I bought the AudioFischer Match 10 DSP amp a while back, but other 1st world issues meant I ran out of time to fit it shortly after I bought it.
I did fix most of my tweeters, mid rnage and woofers which came from Audison, Eton and AudioFischer..
Unfortunately I then learnt the hard way that although I had the 677 aka Top-Fi aka Harmon Kardon 14 speaker system, the power to drive better quality but less efficent speakers.
First of all I thought I had burnt out some speakers, roof down, volume up the OE amp would overheat and slowly shut down, making some very unpleasant sounds, fortunately on cooling normal service, albeit poor quality resumed.
The issue with the E89 although its really an E90 3 series in disguise, BMW couldn't resist doing minor tweaks.
One of the unique tweaks is the addition of woofers to the audio set ups..most BMW have tweeters, mid range and woofers, the E89 has those plus woofers.
What this impacts (and I had this on Match 7 upgrade on my 20i with the 676 mid rnage 11 speakers system) is that the harness the manufacturer supplies (and in this case the suggested initial DSP s/w setup) are wrong...
Neither the harness nor the s/w recognise the existence of the woofers and /or try and push the subwoofer setting to the woofers.
Not a major issue for a competent installer but can catch the not so well informed out.
As this DSP/amp is generic (although AF do, thank god, supply almost a complete harness) then its an integration job to get around the vagaries of the extra 2 channels that E89s have over E90s.
Fortunately the Match 10 DSP is an extremely clever puppy..it has the ability to completely abstract all the input channels, be that 4 analogues, two digitals or an on board card handling bluetooth or USB inputs and then map them through a virtual management intereface to any of the 10 amplified channels and one line out (maybe for a meg subwoofer amp?)..
So in s/w in the DSP you can allocate which outputs physically exist and their amps to any / all /some of the inputs.
In addition for each physical channel you can tailor the low pass, high pass filters so you don't send loads of bass to your tweeters etc.
These filters can have different slopes and use different types of filter eg Butterworth, Bessel and so on.
at some point, because each speaker is a different distance to the lsiterner's ears..you can adjust the time taken to all coherently arrive at those ears..either by simpple physical measurement or by using the clever sampling tools to determine that for it self.
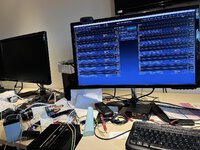
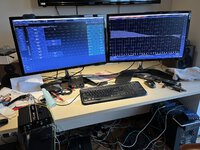
After re-reading everything 5 times over and checking TIS wiring diagrams, an afternoon on the PC saw the basic set up completed.
I'll now set it up in test format before doing a proper physical mount.
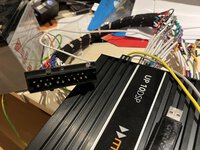
The one thing that's new to me is the MOST to digital interface box..the small one!
More modern cars, and the 677 amp on the E89 use a fibre optic daisy chain called MOST to move many types of higher volumes /faster data around the car.
Just cause its digital doesn't mean its directly compatable with the simple two chanel digital input to most (pun) amplifiers.
The MOST protocol, carries audio along with many other things..so what's needed is a bridge between MOST bus and the fibre optic digital input to the amp..this is a highly specialised bit of kit..AF makes this baby that can be configured for many verions of BMWs and others..Audi, LAnd Rover, Lambo, Merc, Porkster, Volvo and the VW Toureg..
So after I've stripped the back of the car out to get to the subwoofers to replace them with my uprated AF subs, we'll do an initial test..
For those whose idea of a good audio system is a reasonable volume stereo amp and 2 or 4 speakers then ignore the rest of this post..
I bought the AudioFischer Match 10 DSP amp a while back, but other 1st world issues meant I ran out of time to fit it shortly after I bought it.
I did fix most of my tweeters, mid rnage and woofers which came from Audison, Eton and AudioFischer..
Unfortunately I then learnt the hard way that although I had the 677 aka Top-Fi aka Harmon Kardon 14 speaker system, the power to drive better quality but less efficent speakers.
First of all I thought I had burnt out some speakers, roof down, volume up the OE amp would overheat and slowly shut down, making some very unpleasant sounds, fortunately on cooling normal service, albeit poor quality resumed.
The issue with the E89 although its really an E90 3 series in disguise, BMW couldn't resist doing minor tweaks.
One of the unique tweaks is the addition of woofers to the audio set ups..most BMW have tweeters, mid range and woofers, the E89 has those plus woofers.
What this impacts (and I had this on Match 7 upgrade on my 20i with the 676 mid rnage 11 speakers system) is that the harness the manufacturer supplies (and in this case the suggested initial DSP s/w setup) are wrong...
Neither the harness nor the s/w recognise the existence of the woofers and /or try and push the subwoofer setting to the woofers.
Not a major issue for a competent installer but can catch the not so well informed out.
As this DSP/amp is generic (although AF do, thank god, supply almost a complete harness) then its an integration job to get around the vagaries of the extra 2 channels that E89s have over E90s.
Fortunately the Match 10 DSP is an extremely clever puppy..it has the ability to completely abstract all the input channels, be that 4 analogues, two digitals or an on board card handling bluetooth or USB inputs and then map them through a virtual management intereface to any of the 10 amplified channels and one line out (maybe for a meg subwoofer amp?)..
So in s/w in the DSP you can allocate which outputs physically exist and their amps to any / all /some of the inputs.
In addition for each physical channel you can tailor the low pass, high pass filters so you don't send loads of bass to your tweeters etc.
These filters can have different slopes and use different types of filter eg Butterworth, Bessel and so on.
at some point, because each speaker is a different distance to the lsiterner's ears..you can adjust the time taken to all coherently arrive at those ears..either by simpple physical measurement or by using the clever sampling tools to determine that for it self.
After re-reading everything 5 times over and checking TIS wiring diagrams, an afternoon on the PC saw the basic set up completed.
I'll now set it up in test format before doing a proper physical mount.
The one thing that's new to me is the MOST to digital interface box..the small one!
More modern cars, and the 677 amp on the E89 use a fibre optic daisy chain called MOST to move many types of higher volumes /faster data around the car.
Just cause its digital doesn't mean its directly compatable with the simple two chanel digital input to most (pun) amplifiers.
The MOST protocol, carries audio along with many other things..so what's needed is a bridge between MOST bus and the fibre optic digital input to the amp..this is a highly specialised bit of kit..AF makes this baby that can be configured for many verions of BMWs and others..Audi, LAnd Rover, Lambo, Merc, Porkster, Volvo and the VW Toureg..
So after I've stripped the back of the car out to get to the subwoofers to replace them with my uprated AF subs, we'll do an initial test..
Attachments
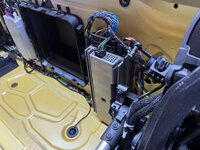
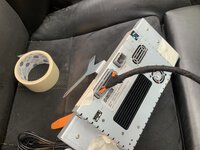
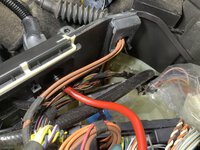
The new DSP amp needs a 50 amp supply.
The old amp has a 40 amp fused supply.
I decided just popping in a bigger fuse and praying wasn’t a good plan.
Normally you just add a thick cable with an in-line fuse and bolt it to the battery positive terminal.
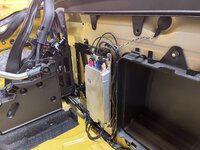
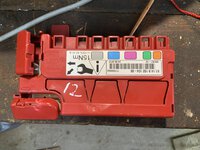
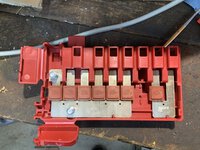
Tried to be neater..I saw that adjacent to that battery is a red box..it’s the main distribution point for ultra heavy current distribution.
I saw one ‘slot’ was free but no ‘spade’ to plug into was free.
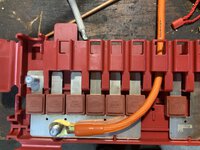
So I bought a used one to take apart and cannibalise..unfortunately internally it’s not just one bus bar but two bus bars separated.
Not to be defeated I’ll still use the idea but attach my new amp feed to the main bus bar and route it via the blank port..
The old amp has a 40 amp fused supply.
I decided just popping in a bigger fuse and praying wasn’t a good plan.
Normally you just add a thick cable with an in-line fuse and bolt it to the battery positive terminal.
Tried to be neater..I saw that adjacent to that battery is a red box..it’s the main distribution point for ultra heavy current distribution.
I saw one ‘slot’ was free but no ‘spade’ to plug into was free.
So I bought a used one to take apart and cannibalise..unfortunately internally it’s not just one bus bar but two bus bars separated.
Not to be defeated I’ll still use the idea but attach my new amp feed to the main bus bar and route it via the blank port..
Attachments
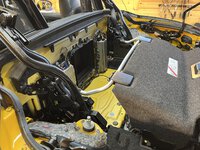
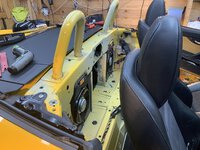
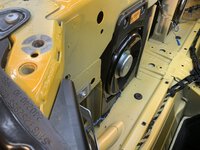
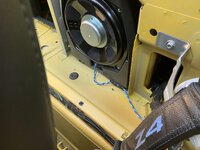
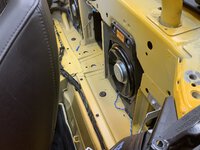
It’s no mystery why hardly anyone offers sub woofer upgrades..it took about 5 hours of steadily working at it to get to the suckers..
To be fair I needed to work out how to get cabling from the cabin and forwards to the rear for the rear camera and the blind spot detectors..
Last time the trim that covers access to the subs I bent down from the top and squeezed my hands in.
This time I took the whole trim panel out.
So to do that you need to..
Remove outer trim panels on deck
Remove out roll over hoop covers
Remove top trim panel
Remove inner tool hoop covers
Remove out quarter top trim panels
Remove front top trim panel
Remove rear quarter speaker grills
Remove sill trims
Remove lower quarter trims.
Remove central speaker and tweeter
Remove upper tie rings
Remove cargo net
Remove lower bolts
Remove centre console
I’m sure I’ve missed a few things..
Attachments
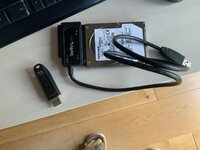
As part of the overhaul /update I'm fitting a new solid state disc to replace the conventional hard disc that's fitted into every CIC radio /multimedia system on E90s of that vintage.
My CIC / sat nav keeps rebooting often for anywhere between an hour and 5 hours..usually when its been left outside and its got cold and damp..usually on a run when I really really need the system to work.
No one has come up with a cogent analysis and/or fix.
Some gurus think its caused by the hDD starting to fail, then the core O/S decides it can't see the required data so re-boots.
I could replace it with another HDD but thought a SSD was more reliable and should be faster..useful when scrolling / zooming on the OE map.
If or when the disc fails you are up s**t creek as tryig to get a replacement is a major major technical issue.
So a pre-emptive attempt to sort it out made sense.
I did think I would have to do a full strip of the box..but it turns out that BMW made and access port...undoing two small torx screws (yes one rounded) allow the carrier with the HDD to be pulled out.
The trick / issue is that BMW used wome weird s**t dialect of Unix to run the system / make the file structure.
So if you try and read the disc with say Windows it ain't going to happen.
To copy it you need a program that will do a bit for bit or techically a sector for sector copy..it doesn't care what is there..it simply copies everything verbatim.
After trying 5 'free' products I came across one Hard Disk Manager 17 which for £75 actually works..
So i've used a USB to IDE adaptor to plus the old hard disk into my desik top pc..using this s/w copied the image of the HDD onto a 128gb USB stick..now when my new SDD arrives shortly I can copy the USB contents to the new 128gb SSD and if it all wroks, plug it into the CIC and voila..no re-boots and much faster map action..here's hoping!
Attachments
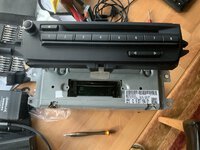
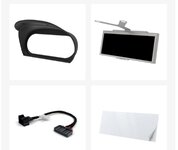
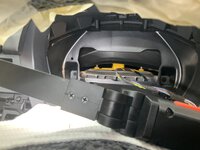
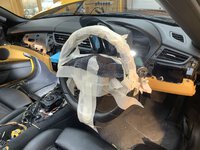
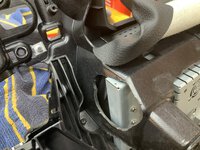
So today started on the re-furb update on the dash trim / MMI CarPlay and the digital dash…
I decided not to take the steering wheel off..but covered it as I’ve got to dremel out some of the plastic to accommodate the rectangular display unit..
Got to add some extra pins and cables for the blind spot monitoring and the reverse camera..plus the boost sensor..which I’ve agreed to work with ID4Motion in developing a kit / write up..
The CIC unit is getting a new cold state disc to hopefully address a re-booting issue..
Attachments
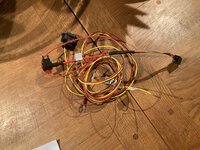
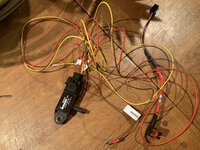
As stated I'm actiing as Guinea pig for ID4 Motion setting up a build kit so the digital cluster can show boost as one of its 'dials'...
Actually for the N54 cars it would be a lot easier to tack int the CAN bus and pick that data up..but ID4 want a generic solution for all BMWs.
So their plan is to take an off the shelf boost sensor and then send the data from it directly to the ID4 cluster.
It means I'll have to drill a hole into the manfold somewhre and run a pipe across to this boost senor before it sends the dat to the cluster.
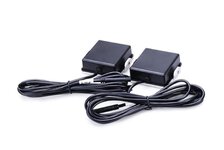
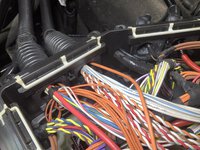
In parallel to this. I've got to plud the radar units for blind spot detection in..similar issues apply..so that's a few extra pins to put into he 36 way connector into the back of the cluster..not abig fan of pulling these connectors apart but I'm assured its all OK..
So many cables my brain hurts..
Actually for the N54 cars it would be a lot easier to tack int the CAN bus and pick that data up..but ID4 want a generic solution for all BMWs.
So their plan is to take an off the shelf boost sensor and then send the data from it directly to the ID4 cluster.
It means I'll have to drill a hole into the manfold somewhre and run a pipe across to this boost senor before it sends the dat to the cluster.
In parallel to this. I've got to plud the radar units for blind spot detection in..similar issues apply..so that's a few extra pins to put into he 36 way connector into the back of the cluster..not abig fan of pulling these connectors apart but I'm assured its all OK..
So many cables my brain hurts..
Attachments


So after a minor cold before Christmas and a mother of all colds after New Year back to the grindstone.
Many things to do and still takimg more bits off than putting back together.
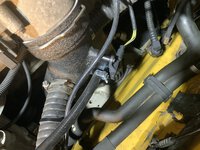
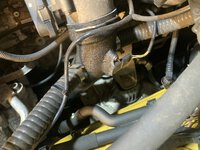
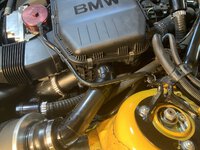
Today fitted the boost sensor tap to allow the IDMotion digital instrument cluster receive its boost pressue readings from its own private off board pressur sensor.
As usual with these 35d party things even more of a f€%£fest than even BMW offers.
The very expensive Forge Motorsport version of the boost sensor tap comes with a nicely machined sluminium fitting and supplied ‘with all the fittings’ for N20, N54 and N55 engines.
Takimg the old screw out..M5 standard I pondered on the new screws..some discrepancies it seemed..
Yup they had provided some fairly brutal self tapping screws..perfect for fitting to a precision machined aluminium casting…not..
Fortunately I had some suitable screws albeit with a Philips head rather than torx or Allen..
Anyway now fitted..hopefully there won’t be a boost leak from it.
The ID4motion wiring harness was designed for LHD car..there’s not enough cable to go from an instrument cluster on the RHS across to the duct on the left hand side into the electronics box in the engine bay.
So I’ve ordered a 2 metre boost pipe (20 bar) and sent that into the pax cabin via the electronics box..I’ll fix the new ID4 specific boost sensor in the paxczbin then I’ll have enough cable to reach the ID cluster.
Whilst I was there I laid the cable in for the front parking camera.
A suitable 13mm hole drilled in the electronics box and then some black sealant to render it water tight.
How to spend most a day..
Many things to do and still takimg more bits off than putting back together.
Today fitted the boost sensor tap to allow the IDMotion digital instrument cluster receive its boost pressue readings from its own private off board pressur sensor.
As usual with these 35d party things even more of a f€%£fest than even BMW offers.
The very expensive Forge Motorsport version of the boost sensor tap comes with a nicely machined sluminium fitting and supplied ‘with all the fittings’ for N20, N54 and N55 engines.
Takimg the old screw out..M5 standard I pondered on the new screws..some discrepancies it seemed..
Yup they had provided some fairly brutal self tapping screws..perfect for fitting to a precision machined aluminium casting…not..
Fortunately I had some suitable screws albeit with a Philips head rather than torx or Allen..
Anyway now fitted..hopefully there won’t be a boost leak from it.
The ID4motion wiring harness was designed for LHD car..there’s not enough cable to go from an instrument cluster on the RHS across to the duct on the left hand side into the electronics box in the engine bay.
So I’ve ordered a 2 metre boost pipe (20 bar) and sent that into the pax cabin via the electronics box..I’ll fix the new ID4 specific boost sensor in the paxczbin then I’ll have enough cable to reach the ID cluster.
Whilst I was there I laid the cable in for the front parking camera.
A suitable 13mm hole drilled in the electronics box and then some black sealant to render it water tight.
How to spend most a day..
Attachments
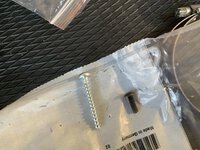
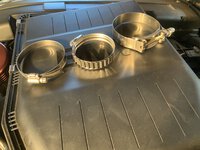
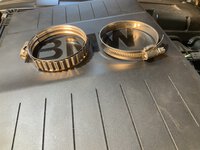
It’s the little things ..
I’ve always hated Jubilee clips aka Terry aka worm drive ..
They always make an installation botched.
These Murray constant tension clips are sooo much nicer..
I’ve got some T bolt versions but they are overkill even for me..
I’ve always hated Jubilee clips aka Terry aka worm drive ..
They always make an installation botched.
These Murray constant tension clips are sooo much nicer..
I’ve got some T bolt versions but they are overkill even for me..
Attachments
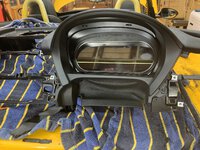
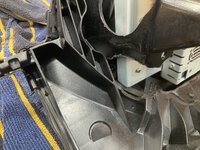
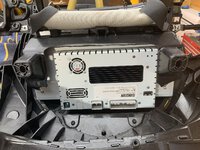
The fitment of the ID4Motion digital cluster is turning into a nightmare.
The primary issue appears to be that the generic hardware ..used on many BMW models like 3/5/7 series is just too big to fit in the E89 instrument cluster space.
I couldn't make their installation instructions work..certainly without severely scratching /damaging the plastics in and around the instrument binacle.
So I've taken the whole dash out to fit it.
Even then its a f$%kfest...some of the screws that hold the dashboard together and to the rest of the car have to be jettisoned.
I'm not very happy at all.
Had I known how difficult and the compromises needed I certainly wouldn't have bought it.
But I've started so I'll continue..
The darkest hour is before the dawn..
Is that dash support structure cast aluminium? Looks way nicer than my welded steel 1-Series one.
Yes pretty chunkyIs that dash support structure cast aluminium? Looks way nicer than my welded steel 1-Series one.

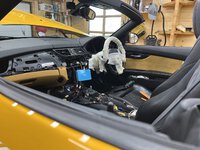
Day 2…the nightmare continues..
My buddy in Italy also with a yellow 35is is doing the exact same retrofit…he’s kept the dashboard in place..but he’s struggling as well.
Here’s my wooden mock up of the ID4Motion screen to help with initial set up.
Called it a day..by this time the dash is looking like a guyere cheese.. :headbang:


My buddy in Italy also with a yellow 35is is doing the exact same retrofit…he’s kept the dashboard in place..but he’s struggling as well.
Here’s my wooden mock up of the ID4Motion screen to help with initial set up.
Called it a day..by this time the dash is looking like a guyere cheese.. :headbang:
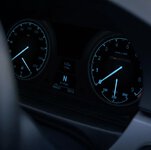
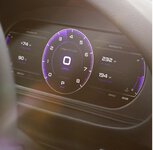
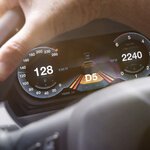
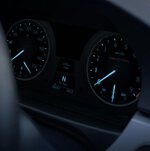
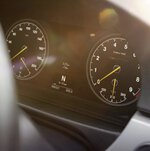
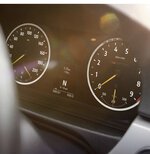
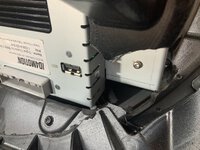
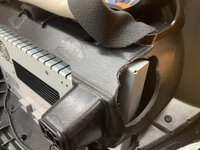
Day 3..finally got a trial fit..my poor dremel has had a few tiring days…
Here’s a few static pics plus a YouTube link….
The key point that emerges is you have to take the top cowl off the instrument cluster, then fit the new ID4 cluster to the removed top cowl, then refit the top cowl to the dash..
The issue is the 4 of the 6 screws are hidden..two are easy, one difficult, three almost impossible..
My friend in Italy fitting his to another Atacama Yellow LHD 35is has lost his temper and butchered the fittings and glued the whole thing together.
Attachments
Similar threads
- Replies
- 2
- Views
- 719
- Replies
- 2
- Views
- 610
- Replies
- 0
- Views
- 601