2009 E89 Z4 35i Black to white build

Osiris

Specialist
Sep 19, 2019
83
13
0
South Africa
Ride
2009 E89 BMW z4 35i DCT
So As usual work has never stopped on this car so here is a small update.

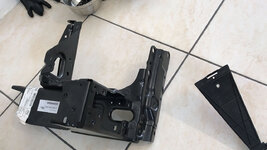
Recently I decided to replace the front cross link bar and left and right support of that bar as mine was all scratched and ugly looking and triggered my OCD every time I opened my bonnet. 12 and 13 are the parts I am talking about.

crosslink.jpg
This required a lot of work to get to the part 12, part 13 was easy to change. Anyways while changing that I also upgraded my old 5" intercooler with the 7.5" race stepped intercooler which was even worse of a job due to the outlet pipe to the charge pipe angle but I made a plan in the end that worked out so well.
So first I laid out rubber matting in my garage to work on so I don't damage tiles:

402385E4-8789-4A37-8E74-EDBD6EEDC1EA.JPG
Here is part 12 that I wanted to replace:

?hash=e680ae3bdef77832442aa4e144fb90b6.jpg
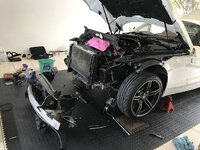
Car being jacked up and getting everything ready:

EC487CAF-C90E-48A4-AC80-5B5FF452730A.JPG


Striping underway with the help of my buddy Justin (@ General.Massacre on the forum):

IMG-9122.jpg
More stripping, the more we stripped the more we realized we needed to strip to get to this part, Turned out to be a massive job.

IMG-9123.jpg
Yea....at this point I did start panicking thinking we wouldn't get the car back together properly again lol

IMG-9128.jpg
I cleaned all of this as it seriously triggered my OCD when I saw all this.

IMG-9125.jpg
And finally the old part was out! What a mission!!!

IMG-9129.jpg
Now onto the intercooler part of things...Nice thing about the Z4, absolutely no cutting was required to fit this unlike the E90/2 etc so that was lucky.

IMG-9131.jpg

And here it is in all its glory before being connected.

IMG-9134.jpg
And its up in there with zero cutting but the following pictures will show the issue with the Z4 and this intercooler, you win some you loose some lol.

3DD6AF30-BD8C-4D42-B42F-092B4ED27E7D.JPG
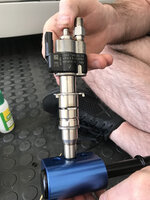
So because my custom charge pipe was custom built by TMSS as a one piece it only fit with the previous intercooler and no chance with the new one which is based on stock spec inlet and outlet pipe angles, so off I went to Sanjeeve at power flow with the stock charge pipe and got him to cut my stainless steel charge pipe to the same length as the stock pipe.

IMG-9367.jpg
Reason being is that the only pipe of pipe that will fit and clear the serpentine belt and other parts is this OEM part, so I drimeled the perma clamps off.

09C0BADE-3885-4611-B1F7-E6BB7DF4B504.JPG
This grove and the angle of this pipe is the only thing that fits perfectly from intercooler to CP, and no one in SA makes a silicon pipe this shape so it is what it is. I tried to put a 45 degree bend silicon pipe but it didn't work as it had a massive fold in it when I forced it to fit which obviously isn't ideal.

5896C4BD-B8EC-405E-ADCB-90E14D0F738C.JPG


This was the outcome and its beautiful and so easy to remove, its like it came from the factory like this, everything just clears and fits like a glove.


IMG-9359.jpg
While I was at it I replaced the silicon join from CP to Throttle body as the old one was Kaput.

IMG-0823.jpg
All put back together and looking beautiful.
IMG-0574.jpg


IMG-9666.jpg


IMG-0704.jpg
Oh yes, I also replaced the expansion bottle cap with the upgraded one as I like the decals on it and well...preventative maintenance.
 

Attachments

  • F16756A6-057F-4CB1-AE18-8DA5498CCC1C.JPG
    F16756A6-057F-4CB1-AE18-8DA5498CCC1C.JPG
    166.8 KB · Views: 13
  • IMG-9128.jpg
    IMG-9128.jpg
    314.6 KB · Views: 14

Osiris

Specialist
Sep 19, 2019
83
13
0
South Africa
Ride
2009 E89 BMW z4 35i DCT
And now recently I decided its time to get my rims fixed and sprayed the correct colour especially now that the car is white! I got this done at Shaheen at the wheel shop who did a superb job. I will let the pictures do the talking.


1c753dce-570e-4693-bb4a-4a52fab4f2a0.JPG


04bce28c-2402-48d8-99b3-52d00e9fd414.JPG


6a95cb05-b884-4c48-88e7-161b61ac623b.JPG


IMG-1134.jpg


db0b218f-e968-4183-bb03-f638bc0f9faa.JPG


IMG-1136.jpg


IMG-1155.jpg


All in all I am really happy with the look of the car now. The 7.5" intercooler made a monumental difference in intake temps, allot more than I was expecting, the strut bar I replaced makes the engine bay look so neat.

I did allot of other things recently on the car too like had the convertible roof repaired as two of the wires where they bend broke with age, I replaced front brakes and serviced the car twice once before my trip to Durban two months ago and then again when I got back.

Next on the list is coil overs as my left front shock has blown out and is leaking oil all over the garage floor so I am just getting quotes from all over and will replace soon as I think the car will look great with a slight drop too. Nothing overboard maybe 15mm or so.

One thing I would like to say is that I bought this car in 2017 for my birthday. It has been one of the most epic journeys of my life, I have learned so much, learned how to change turbos myself, radiators, high pressure fuel pumps and all sorts of parts...Things I never thought I would tackle in my life. Owning this car has been such a pleasure, absolutely love this car and I am always excited to drive it. Its has cost allot of time and money to get it to where it is today but I couldn't be happier it really is an amazing car to drive.
 

Osiris

Specialist
Sep 19, 2019
83
13
0
South Africa
Ride
2009 E89 BMW z4 35i DCT
Oh yes, sorry for the backwards posts, I am just remembering stuff as I post and finding pics so these are not in order, The rim repair and spray was the latest update but here is the port methanol injection install I did last year, the car was still black at the time and front strut thing wasn't replaced yet.

Wiring done partly by me and partly by Coolboost, Pipes all done by me and fittings etc all by me with some help from @General.Massacre, We usually do work on each others cars together.

IMG-7720.jpg
Very nice neat install here. I didn't want to drill into my floor board to mount the tank, I have since cut the carpet to the shape of the bottle and put extremely strong valcro, I went and purchased a new piece of carpet from BMW incase I ever decide to remove this one day. I also put a joiner on the pipe here for easy removal of the tank if extra boot space is required.

IMG-7736.jpg


IMG-7722.jpg
with the tire repair kit the pipe is basically invisible.

IMG-7724.jpg
Intake manifold removed, valves were surprisingly clean due to the charge pipe injection I have been running all this time. I had them cleaned last in 2017. as you can see the blue silicon pipe for the cp to TB in its very sad frayed state which is why it was replaced recently in the above post.

IMG-7620.jpg
Nice stealth install of the distribution block underneath the intake manifold as opposed to having it on top looking all mess as is the norm.

IMG-7627.jpg


IMG-7618.jpg
Brendan at CoolBoost drilled and tapped my spare intake manifold to fit the meth nozzles, I redid all the piping to make it neat like this and all run the same direction, I wasn't happy with how I got it so now the result looks like this :D

IMG-7614.jpg
As per the above post I removed the DCI and put the stock airbox back with K&N flat filter and the intake temps seem allot more happy since doing that and I much prefer the look of the engine bay with the stock airbox.
 

Osiris

Specialist
Sep 19, 2019
83
13
0
South Africa
Ride
2009 E89 BMW z4 35i DCT
So Another relatively big update, well in terms of feel its massive.
for a long time I have had a very strange misfire problem on my car on cylinder 1 and 6, mostly cylinder 6 and I could never figure out why. I have revision 12 injectors. in 2020 I replaced one of them as it was leaking and while replacing it we noticed one of the injectors had a metal tab missing but didn't think much of it as the injector felt solid in the engine block. Little did I know...

So it wouldn't show itself on the stock map on stock boost/power settings but as soon as I up the boost and start doing 3rd or 4th gear pulls I would get these missfires, I replaced all the plugs to 1 step colder NGK Laser Iridium Plugs and gapped them correctly to no avail. I bought a brand new set of Delphi metal sleeved coils from BMW last year too, no fix. Fitted port methanol injection as well as charge pipe methanol injection to no avail, had the valves wallnut blasted in late 2017 or early 2018. Replaced o2 sensors I think 4 times, post cat and precat. This problem just persisted and no one could figure out why. I think I may have fixed it now finally.

Engine covers all off:
IMG-1187.jpg


Airbox off:

IMG-1181.jpg

IMG-1185.jpg

Stuff covered to protect paint etc:
IMG-1180.jpg


New Coils removed and still in pristine condition visually:

IMG-1182.jpg

Lighter in the photo but in person a nice light brown so seem to be burning perfectly:

IMG-1183.jpg


My buddy popped over to help out with his awesome Injector removal tool, He actually helped out allot as I hurt my back last week so did basic cover removals and coil removals and cleaning of all the injectors etc, he removed and refitted the injectors. Then we both refitted all the fuel rail lines etc and put everything back together.

IMG-1189.jpg


Pack of injector seals and seats from bmw.

B84151B5-5695-40FF-9E48-1425211618E1.JPG


First injector out:

69470C16-9011-4437-A1F1-12FCD13BF68F.JPG


Seals stuffed, leaking past the seals causing combustion and boost to leak past the injector seal, this really isn't a good sign:

IMG-1192.jpg


Injector 6 seal stuffed and metal tab missing and tip badly caked, this is in the cylinder that gives the most misfires:


IMG-1194.jpg

The tab that should be on the above injector:


IMG-1202.jpg

How badly caked it is and the scratches in the metal from wobbling around, I will be ordering a new injector tomorrow from BMW as this is no good.


IMG-1199.jpg

All injectors and coils etc removed and ready for new seals and cleaning:

IMG-1196.jpg


Another bust seal on one of the other injectors.

IMG-1195.jpg


After allot of elbow grease to get these things cleaned properly, I used engine degreaser and a microfiber towel:

E0AD829F-A927-4B7D-9D3F-93BDA4064E62.JPG


Seating the new seals the correct way and fitted the new crusher washer thingamajig lol
IMG-1200.jpg


A good soaking of all the tips for cleaning for around an hour or so.

IMG-1197.jpg


So the outcome of all this after refitting is day and night, the car has never felt this good before, the throttle has become extremely sensitive now and it idles incredibly smoothly. The drive is so much better and the car seems to surge with power I would imagine this is due to no boost escaping past the injector seals and the cleaning of the injector tips which would clean up the spray pattern allowing it to atomize a bit better. All in all a great fix, we did multiple pulls to test the car out back to back and got no more cylinder 6 misfires and the car pulled smoothly all the way to redline.
I am going to order a new injector tomorrow though and a new oil cap as mine seems to be leaking a bit.

A big shout out to @General.Massacre for the help as always and as always its great to work on my car with a good buddy and its always a good outcome as we are both incredibly OCD so we do everything properly and to the book and torque everything to spec.

More updates to follow soon.
Attachments
 

Attachments

  • IMG-1200.jpg
    IMG-1200.jpg
    142.3 KB · Views: 14
  • IMG-1200.jpg
    IMG-1200.jpg
    142.3 KB · Views: 12

Osiris

Specialist
Sep 19, 2019
83
13
0
South Africa
Ride
2009 E89 BMW z4 35i DCT
Ok so here comes another relatively big post this has been a very busy weekend, Justin (@General.Massacre) and I were up till 3am last night with the intake and methanol install of a second solenoid. But first lets start with the easy stuff that made a big difference to my car too.

So first up my bonnet shocks have been driving me crazy, they held the bonnet up but every time less and less till it was barely able to hold the thing up. One day it was going to fall on my head for sure.

New shocks curtesy of ABM BMW:
IMG_1299.JPG

old shocks out, this was a really really easy job that took me less than 5min, just a flat screwdriver to remove the metal clip and it pops right off.

IMG_1306.JPG


installed!

IMG_1301.JPG
It lifts itself open now even :D


Next up steering wheel! I actually upgraded to an msport steering wheel a while back, it wasn't in a bad condition at all however when I was at MD house yesterday I saw another one and it was in very good condition so I snatched it up. I will show the state of my current steering wheel which was actually just dirty and I did clean it afterwards and will have it up for sale but let the pics do the talking:


IMG_1341 (1).jpg


IMG_1342.jpg

How shiny it was....I HATE shiny steering wheels!

IMG_1332.jpg
The back of it! I thought this was worn leather but its just dirt!, after cleaning this thing it came out really well. but wait till you see the new one :)

IMG_1350.jpg
When I found it. In its non shiny state I was already sold. I walked back to my car and then thought no, z4 e89 msport steering wheel is Heins teeth I'm buying it!

IMG_1316.jpg
Did some cleaning

IMG_1333.jpg


I mean this is the new wheel and look how manky it is haha, but I really wish I took a photo of my current steering wheels water after cleaning, it was absolutely disgusting to say the least!
LGRP3097.jpg


and now onto how good it has come out and after fitment! in the next post due to image number limitations.

Removal was very simply, I have gotten this down to a fine art, takes me literally less than a a minute to get the air bag off. Remember for anyone trying this themselves please disconnect the negative terminal from the battery and leave the car for at least 30min to be on the safe side, setting an air bag off will put you in hospital and if you don't set the air bag off you could cause the airbag light to come on and that will be a ball ache to get rid of.

IMG_1347.jpg


New steering wheel after cleaning! Damn she is beautiful!


IMG_1335.jpg


Oh she is beautiful, the car looks new inside and feels new too, this was before I stuck the msport badge onto the wheel which I took off the old one.


IMG_1349.jpg


IMG_1351.jpg


Right now that the bonnet shocks and steering wheel is out the way, onto the important stuff!
 

Osiris

Specialist
Sep 19, 2019
83
13
0
South Africa
Ride
2009 E89 BMW z4 35i DCT
So as I explained previously I have had funky missfires in cylinder 6 and 1, 6 was due to a funky injector due to the metal tab missing causing it to sit too far in the cylinder which causes bad spray and bad carbon buildup on the head of the injector and if left for too long, along with a bad decoupler can actually cause damage to the head, luckily this wasn't the case with me as the decoupler was alright so the head is still perfect and the new injector went in with a very nice tight snug fit and since then no missfires in cylinder 6 again, not once!

Now Cylinder 1 had another issue that was hard to narrow down but I thought outside the box and used some common sense and came to the conclusion that due to only having one solenoid for the methanol system which was controlling flow to the port distribution block and then also the charge pipe injection which is at the end of the distribution block which holds the 3 pipes going into bank 1. I was having misfires in cylinder 1 if the car went into vacuum once the pedal was at zero throttle and if brakes were pressed which automatically puts the manifold under vacuum. If no solenoid is at the end of the distribution block then under vacuum the remaining methanol in the lines is being pulled into bank 1 and especially cylinder 1 causing strange pops and bangs and flames out the exhaust which sounds nice but it isn't supposed to happen under these circumstances.

So I ordered another solenoid from coolboost who I have been using for years with phenomenal support, Brendan and his team always come to the party for me and always help me out even on a weekend when I need a part he will open the shop and help me out so a big shout out to performance products SA for all the help over the years. Postage was fast and prompt!


IMG_1267.jpg

Right now onto the big work as this was a monster of a job to say the least as @General.Massacre and I spent from around 15:30 to 03:15am busy with this as we went all out making this an incredible install and also making sure that its 100% plug and play so that we can easy remove the entire manifold next time without cutting any wires etc, so I built plugs for everything (water proof plugs obviously as I do like to keep my engine bay clean).

Prepping the car! Thank goodness for the new bonnet shocks else this job would have sucked!

IMG_1353.jpg


Airbox and throttle body removed and all other things like tmap sensor wires etc.

IMG_1354.jpg


Manifold off!

IMG_1359.jpg


Front on view of everything removed.
PHOTO-2021-08-21-19-04-24_1.jpg

Almost 5 years later and my intake valves are still in immaculate condition, I really think all N54 owners should install port meth for this reason alone! Don't need to tune for meth just have it installed so that you don't cake up your valves with gunk every 15 - 30k km, The proof is in the pudding guys! You can go back to previous posts in this thread and have a look at how bad my valves were before the carbon clean in 2017.
I wish I installed methanol sooner cause these would look brand new still if I did. And I do not have an oil catch can! nor do I want one!


PHOTO-2021-08-21-19-04-21_1.jpg


How incredibly clean my intake runners are due to the methanol injection too, this compared to my old manifold is a joke!
IMG_1357.jpg


Current setup before installing the secondary Solenoid on the other side of this distribution block!
IMG_1356.jpg


Cutting and soldering wires to create plugs for easy install and removal.
PHOTO-2021-08-21-19-04-22.jpg


Plugs sorted, will wrap in conduit as you will see in the following pics.
IMG_1374.jpg


New solenoid fitted in the perfect location to allow perfect clearance, so this basically means that when the solenoids close no vacuum from the manifold can pull from the throttle body pipe or anything due to a complete blockage of the system.
IMG_1364.jpg

Wiring after soldering and now heatshring, so heatshring over the individual wires and then heatstrink over those to further protect the wires.

PHOTO-2021-08-21-19-04-22_1.jpg


Applying conduit and neatening things up nicely.

PHOTO-2021-08-21-19-04-23_1.jpg


Final cleaned up install of wiring and piping, We tested both solenoids via a battery charger supplying 12V to make sure both function perfectly.
IMG_1371.jpg


Here is @General.Massacre busy holding the charge pipe nozzle in a bottle while I prime the system and he checks inside each port to make sure all nozzles are spraying correctly!

IMG_1367.jpg

Further final adjustments of each pipe and nozzle.

IMG_1368.jpg


A cool little video of the system priming to show how well its working, I should have filmed inside each runner to show how it sprays inside but it was getting messy lol but its working beautifully!


A nice neat install of the flow sensor and wiring as you can see the plugs are nicely hidden away but easily accessible, I also took old O2 sensor sheathing and placed it over the methanol pipe closest to the block to protect from heat not that its needed I'm just OCD about stuff like that.

IMG_1355.jpg


And after everything is all fitted and done!

IMG_1388.jpg


IMG_1308.jpg


We took the car for a drive and did quite a few 3rd to 5th gear pulls to test and the car now runs flawlessly! what a difference!
I have now also ordered the coil overs from Shaheen at the Wheel shop so this should arrive in the next few weeks and if I can I will buy a front lip from Firi at rennzport which will really give the car its final touches.

But for now this car is amazing to drive, its incredibly smooth, the power due to the fixed up methanol setup is very linear and smooth and Sheheen fixing the buckled rims on the left have made this car a pleasure to drive. The steering wheel well....That was just the cherry on the top.

Big shout out to @General.Massacre again for coming over and helping out. Guys we will be putting up a huge Turbo install DIY on the forum soon for his car so keep a look out for that too.
 

Osiris

Specialist
Sep 19, 2019
83
13
0
South Africa
Ride
2009 E89 BMW z4 35i DCT
So I did some more stuff to the car!

This was a bit of a nightmare due to a certain person which I wont go into right now. But I found a guy named Mo via a website https://www.ultraracingsa.com/ who managed to clean up the mess with my previous order and sort me out very quickly! My order arrived exactly when he said it would and it was such a pleasure dealing with him, Very knowledgeable, sent tons of articles etc on installation and correct setup as well as general info on the product. He was happy to answer all my millions of questions.

I then got into contact with Clint at MMS Auto who did the installation as I just wasn't in the mood for taking on another big install after helping Justin with his Turbos on his 335i. Clint's work for a while via this website and the z whatsapp group. His work speaks for itself so I finally decided to bite the bullet and give him a try as he is very much like me with how he goes about things, He cleans parts, uses a torque wrench! He treats your car as he would his own.

DSWK7619.JPG


DTQH1363.JPG

EKHO3936.JPG


FEQE6781.JPG


FYGJ4862.JPG


GZIQ4090.JPG


IMG_1829.JPG

The difference between the stock springs and the springs that came in the kit.
FDOK8780.JPG

Old suspension out! As you can see the front left shock kakked itself, Love our JHB roads!
AZRH0664.JPG

KUCC5627.JPG

The rest of the stock suspension was perfect, just the front left shock was in a wrecked state. I went to the scrap yard to try find a used shock and they wanted 5.5k and BMW wanted 11.5k for one shock! so I decided to go coil overs as getting one shock from the scrap yard worried me as I didn't know what the condition of that shock would be.

Besides I have always wanted to go coil overs as I have never really been content with the suspension in the E89 Z4.


So Clint got to work installing the coil over kit for me. Unfortunately I sent the car to him dirty lol, I didn't think I would send it on the day I did, but I was pressed for time.
AYFX0026.JPG

First problem we ran into was the link here was the oem one which was too long and the kit for some reason was missing the link, I let Mo know and he very quickly and happily sent a fully adjustable set and was very confused as to why the kit was missing those links too. Early the next morning they arrived and Clint was able to complete the install.

NMGM4279.JPG


The adjustable links that arrived at Clints house.
UROD7824.JPG

Removing stuff.

JHNC4663.JPG


Cleaning parts the same way I do which made me very happy to see!
URHJ5378.JPG

Lock tight on certain bolts that required it for a better installation!

DAXY5810.JPG


Front coil over in with new adjustable link (it's late I cant think of the name of this part right now lol)
JCNR9421.JPG


Marking bolts at the correct torque settings for future use!

EQJX5479.JPG


Back shock and spring in, more about this in the next post as a maximum of 10 pics per post is allowed.
HLLI2749.JPG
 

Osiris

Specialist
Sep 19, 2019
83
13
0
South Africa
Ride
2009 E89 BMW z4 35i DCT
So Clint finished with the installation and I was extremely excited to go pick my car up and feel what all the hype of coil-overs was all about. I arrived to a very neat installation with all my old parts neatly packed up in the coil over boxes packed neatly into my boot for me. Clint showed me around the car and explained everything to me and I was very happy with the installation.

Now for the bad(sort of) I got into my car and started reversing it out of Clints garage and as I got onto the paved part of his driveway I noticed the car was very bouncy, I have never felt coilovers before so I thought perhaps this was how it was meant to feel, I continued on my journey back home (1.8km....luckily) and half way home I called Clint to ask if I was supposed to be bouncing in my seat so hard that the safety belt was catching me and preventing me from hitting my head into the roof! He said that it doesn't sound right at all. I gave Mo a call and told him something wasn't right so Mo asked that I take photos of the back springs as he suspected they weren't installed correctly as they needed to be preloaded which I think we forgot to do correctly (No fault of Clint) These rear springs were so small it was unbelievable, When I went back to Clint's house we tried something with the back shocks to try remedy the problem but made it worse as I interpreted the message Mo sent me incorrectly, basically when we put the car on the lift I was able to reach in and take the spring out as it was just resting on the cradle :ROFLMAO: (Yup I done F#@%$ked Up), Clint looked at this and said this can't be right, if I take a corner too fast or hit a bump the spring was gonna fall out. Yes he was right haha.

Mo offered to come through and sort this out as I was ready to burn the car and the suspension and be done with BMW's, I was delighted to hear that Mo would come through and both Clint, His Brother and myself all complimented on what Mo was willing to do to come get this working out correctly for me, Outstanding after sales support! I have never heard of customer service like this in SA before in my life, Mo was all the way out in fordsburg! so it was a very far drive for him!

Anyways I drove back to Clint the next day and the drive almost made me throw up, I was ready to call a tow truck as I couldn't take the ride anymore but I persevered! 🤣

Mo arrived at Clint shortly after me and I offered to take him for a drive to show him just how bad the ride quality was and what he thinks could be the problem, he looked at the spring and said lets get the car on the lift as he can see what the problem is so we did that, he sorted it out quick stix and I went for a drive....It was much better but it was still hella bouncy! Mo came with and felt what was going on, we tested a few settings on the damping and then he decided no, this spring isn't right, so he offered to drive out back to Fordsburg and fetch other rated and sized springs and even bought us all Lunch!
IMG_1886.JPG

The tiny spring the kit came with! We went for the one on the left which is a 160mm 10kg spring, Mo and Clint along with his Brother and helper all fitted the springs, Mo set everything up and Bam like magic the car was sorted!
IMG_1887.JPG

I was able to drive to Lanseria and write my Air Law exam! Yay! I wasn't completely happy with the ride quality as this was a much longer drive where I got a good feel for the car. So I got fiddling myself the next day after speaking to Mo and getting a bunch of advice. I wanted the car lower at the back, Justin came over and tried helping, eventually we pulled the top hat off and went for a drive and it was terrible, and dropping the car to the height I wanted actually looked shit! so we put it back! WHAT A FLIPPING MISSION! @General.Massacre had one hell of a work out bouncing on my disc and Caliper while I pulled on the spring to get it out, it took us hours to get it back out and then even longer to get it back in, but we learned allot for next time HAHA.

What we ended up doing was raising the right side slightly to match the left and now the car feels amazing. We went for a good couple of drives, some relatively high speed cornering, The car feels like its on rails! We stopped multiple times and adjusted dampening till we got it dialed in really well! we did some launches. The car has never launched like this before, there is zero squat it just goes forward rapidly! feels so damn good!

A big Shout out goes to Mo, Clint and his Brother and again to @General.Massacre for all the help getting the springs in and out and helping to dial the car in. My car has never handled so well before! This has made such a difference to the feel of the car!

AWXF5192.JPG

IMG_1891.JPG


IMG_1892.JPG


IMG_1893.JPG


IMG_1904.JPG


IMG_1906.JPG

I will drive the car for a good 500km and report back, it would have all settled nicely by then! I will take a few more pics outside to show how nice she is sitting.


Again thanks to Mo and Ultra Racing for sorting me out with this setup and helping me out so much and even driving out to sort it out! What an awesome guy! and To Clint and his Brother at MMS Auto What Awesome guys to deal with!
 

Osiris

Specialist
Sep 19, 2019
83
13
0
South Africa
Ride
2009 E89 BMW z4 35i DCT
Then Last night I decided to sort out the carpets in the boot to allow for adjustments of my coil-overs as well. Removing the carpets each time is not going to work for me obviously.

So I measured out where it sits in relation to the carpet dimple as best I could. This was such a painful job to get right and the initial hole wasn't nearly good enough, lots of cutting took place and fiddling in the end.
IMG-2344.jpg


Needless to say, I am very happy with the result. I was unable to find grommets of the size I needed and I must have driven 100km around town looking for places that could have, looked online too and no places in SA had what I was after.

So when I have a bee in my bonnet I make a plan! I decided that the stock turbo inlets grommet would work perfectly and they absolutely did :D I am very happy with this.
IMG-2351.jpg


IMG-2348.jpg


IMG-2352.jpg


Once this was done I was on a mission today to find wheel spacers to get my wheels looking right with the current setup and drop.

Found these and I went with 15mm at the rear and 10mm in the front. what a difference!
BC7E2A4B-40C1-4DD9-9481-79E915ED840B.JPG


IMG-2373.jpg

IMG-2374.jpg

IMG-2375.jpg

IMG-2376.jpg

IMG-2377.jpg


Couldn't be happier.

Next update is rear Msport bumper and diffuser to finish the msport build off, then later on front lip and side sills.
 

doublespaces

Administrator
Oct 18, 2016
9,303
4,331
0
AZ
Ride
2009 E93 335i
Very nice thread, I'll have to go back through it after skimming to see how the color changed.
 
  • Like
Reactions: Osiris

General.Massacre

Corporal
May 14, 2018
219
57
0
Ride
2009 E92 335i DCT
Nice, only saw this now, collating all that info must of taken ages @Osiris lol.
This has been a HUGE change up from where the car came from, and im very happy to have been part of the process and helping where i can, its been so awesome and rewarding to get the car to this stage and level of perfection.
 
  • Like
Reactions: Osiris

proboner

Specialist
Sep 13, 2020
73
23
0
I'm impressed with your patience and persistence with this thing, so many issues have popped up! Also really like the halos, much better looking than any other aftermarket halos for the e89!
 

Osiris

Specialist
Sep 19, 2019
83
13
0
South Africa
Ride
2009 E89 BMW z4 35i DCT
I'm impressed with your patience and persistence with this thing, so many issues have popped up! Also really like the halos, much better looking than any other aftermarket halos for the e89!
Thanks. Honestly it's been a hell of a learning experience and Myself and General.Massacre have done so much good work on this car and have brought it to a level that has made it one of the most reliable cars I have ever owned. It looks new, drives like a new car and performs extremely well. Yea she doesn't make huge numbers on the dyno like some of the cars I see on this forum or like some of the cars here in my country but It makes strong reliable daily power. I can drive this car hard everyday without so much as a hick-up.

Allot of the N54's here in SA also make massive power at the dyno days, but they are weekend warriors and allot of them are sitting in workshops most of the time cause something has broken. I drive this car everyday. Allot of the issues people have with these cars "N54's" are related to upkeep and maintenance. They mod to make power and let maintenance things slide, leave an oil change for too long. Don't replace o2 sensors or injectors till its too late, buy second hand or cheap knock off parts. Then they go and post that nonsense all over the web about how unreliable N54's are and generally give these N54 cars a bad name.

I mod for reliability and then worry about power when everything is perfect in logs and physically in the engine bay etc.
 
  • Agree
Reactions: Torgus